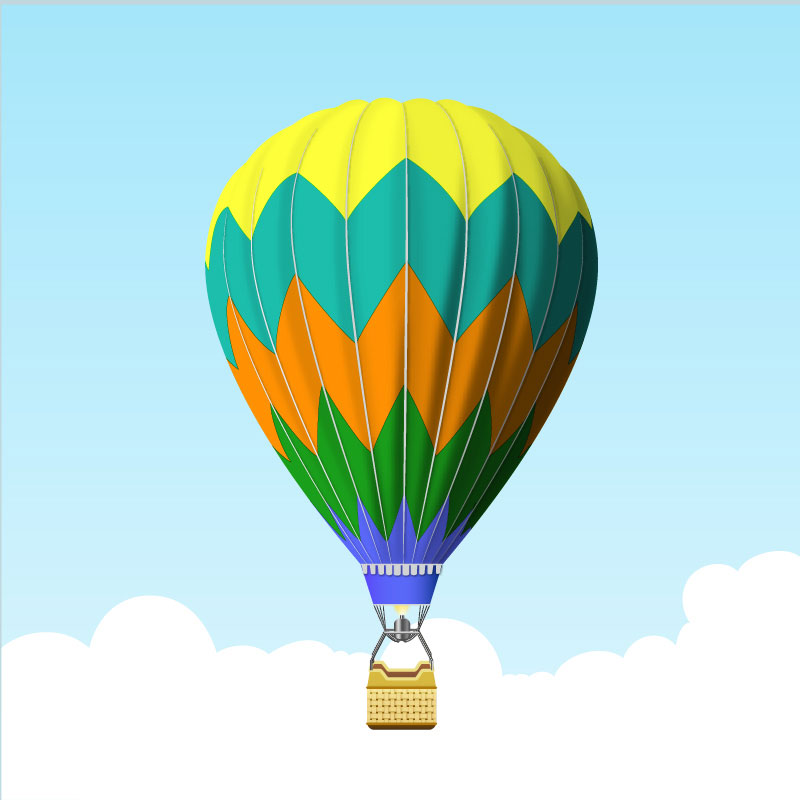
Create a Hot Air Balloon in Adobe Illustrator
使用 Adobe Illustrator 創建熱氣球

In this tutorial, you will learn how to draw a hot air balloon illustration in Adobe Illustrator.
在本教程中,您將學習如何在Adobe Illustrator中繪製熱氣球插圖。
As usual, we will use basic tools and vector shape-building techniques to create the main shapes. You will also practice your drawing skills, apply gradients for more realism and use some basic effects. Let’s have fun with this one!
像往常一樣,我們將使用基本工具和向量形狀構建技術來創建主要形狀。您還將練習您的繪畫技巧,應用漸變以獲得更逼真的效果並使用一些基本效果。讓我們玩得開心!
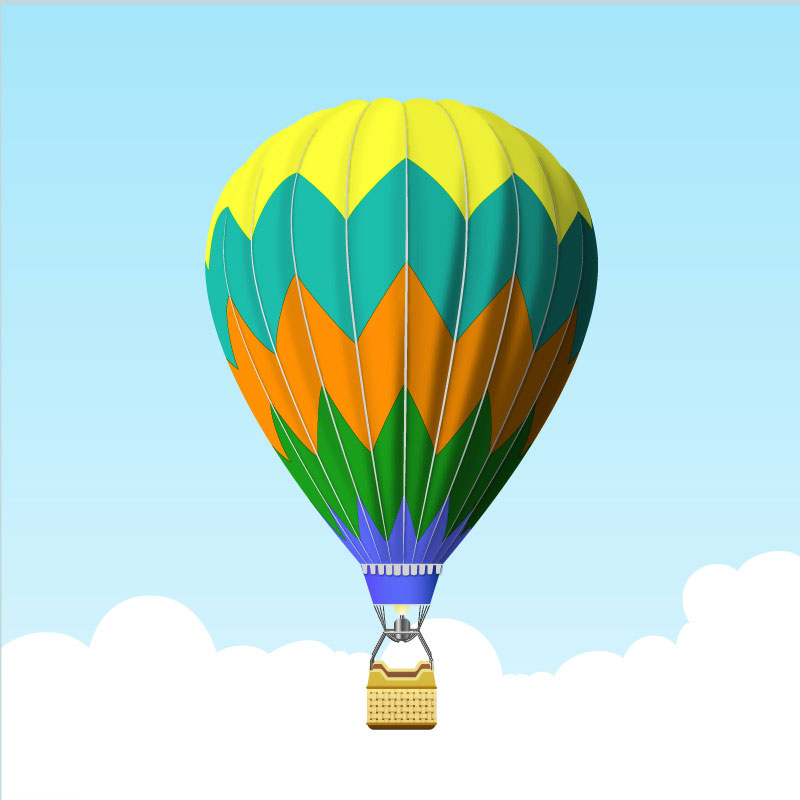
Final Image最終圖像
As always, this is the final image that we’ll be creating:
像往常一樣,這是我們要創建的最終圖像:
Tutorial Details產品詳情
- Program: Adobe Illustrator CS6
程式:Adobe Illustrator CS6 - Estimated Completion Time: 120 minutes
預計完成時間:120分鐘 - Difficulty: Beginner-Intermediate
難度:初級-中級
步驟1
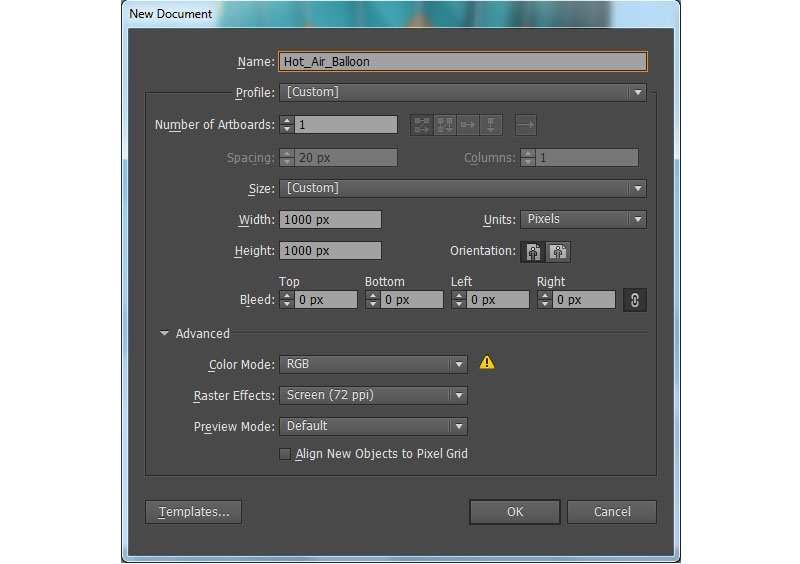
Launch Illustrator and then press (Ctrl + N) to create a New document. Select Pixels from the Units drop-down menu, enter 1000 in the width box and 1000 in the height box then click on the Advanced button. Select RGB, Screen (72ppi) and make sure that the Align New Objects to Pixel Grid box is unchecked before you click OK
啟動Illustrator,然後按(Ctrl + N)創建新文件。從單位下拉菜單中選擇像素,在寬度框中輸入1000,在高度框中輸入 1000, 然後單擊進階按鈕。選擇RGB,屏幕(72英寸),並確保在單擊確定之前取消選中將新物件與像素網格對齊框
步驟2
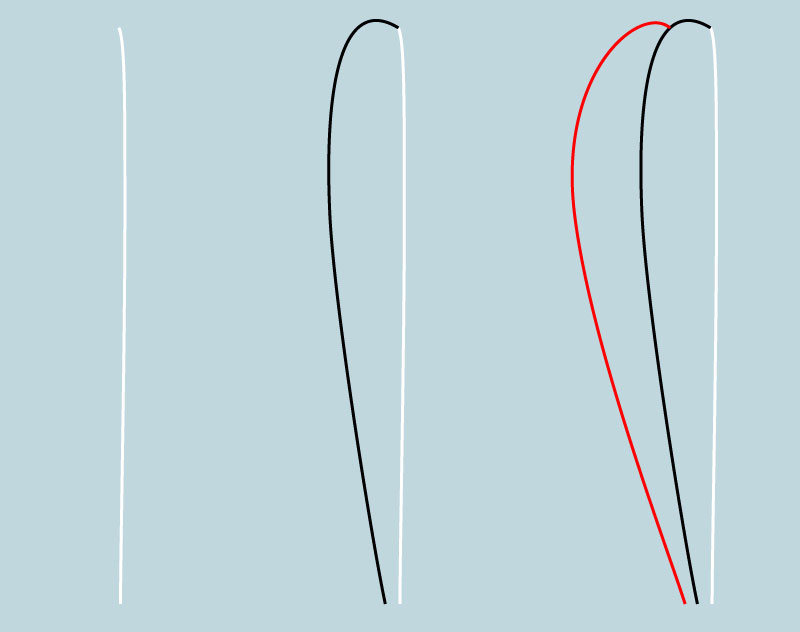
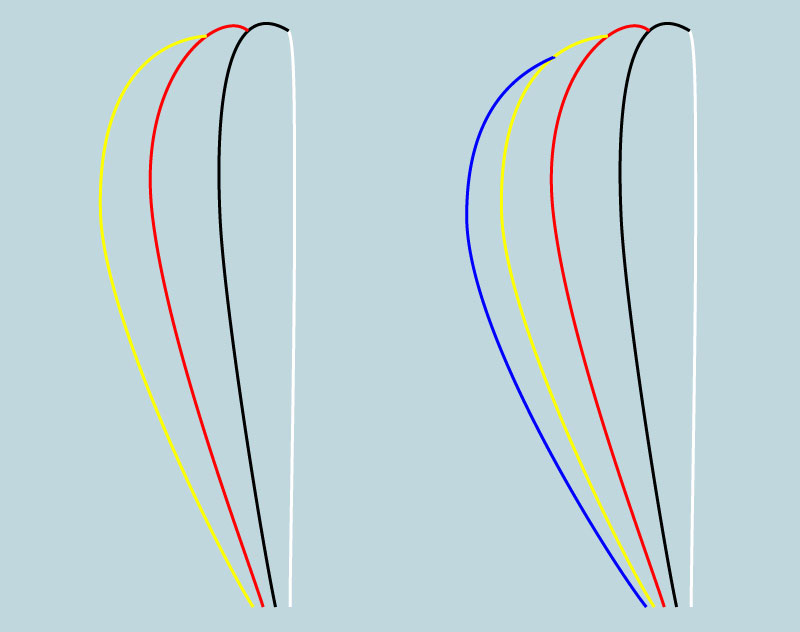
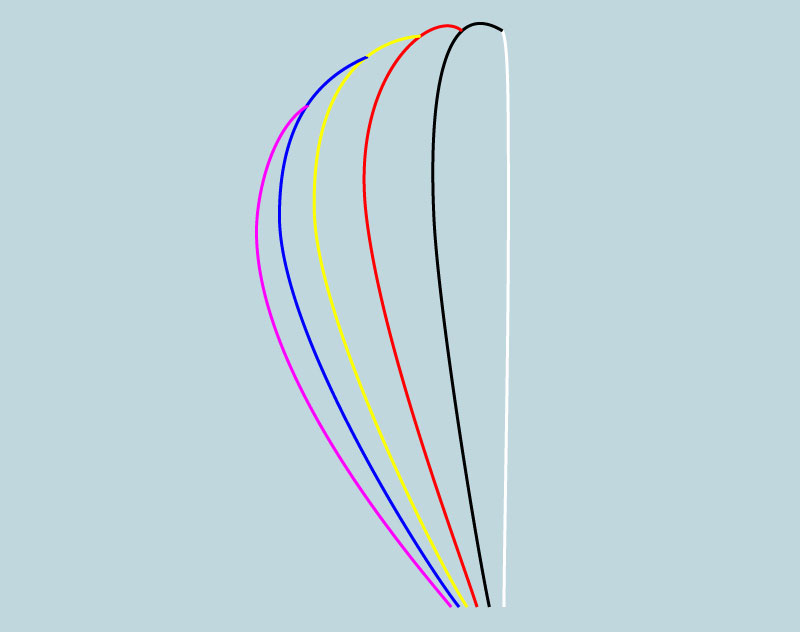
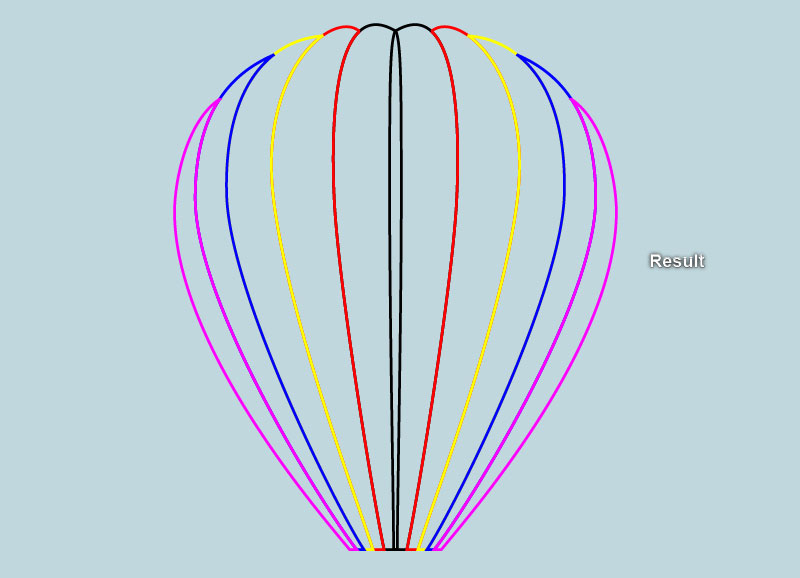
Let’s start by creating the envelope of the hot air balloon. Pick the Pen Tool (P) and create six curved paths like you see in the images below. You should end up with something like in the last image.
讓我們從創建熱氣球的氣囊開始。選擇筆形(鋼筆)工具(P)並創建六條曲線路徑,如下圖所示。你應該會得到像上一張圖片中那樣的東西。
步驟3
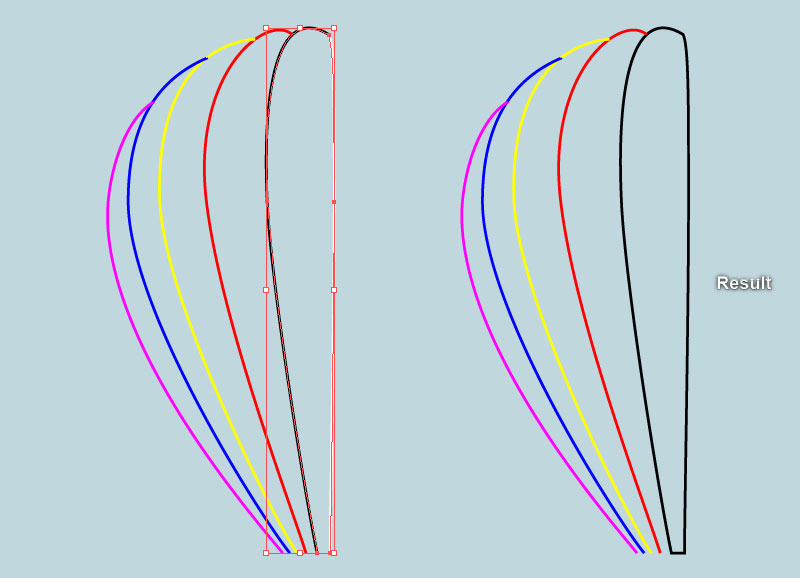
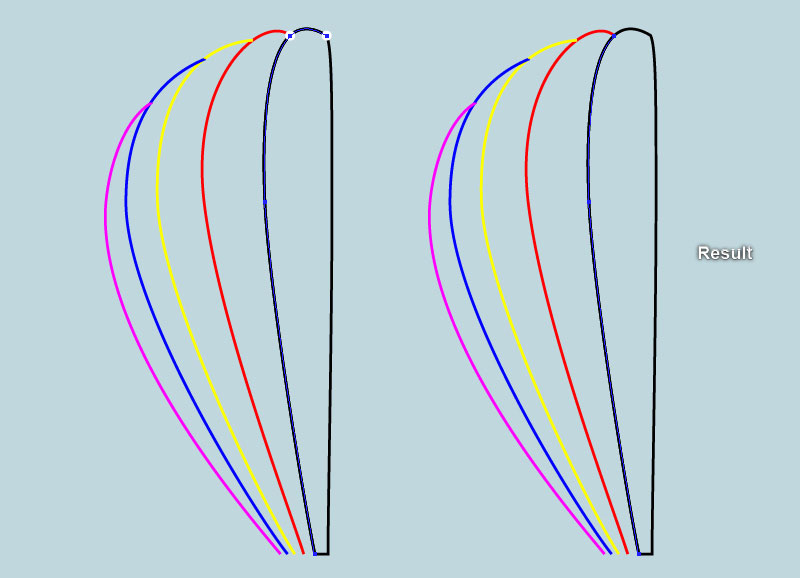
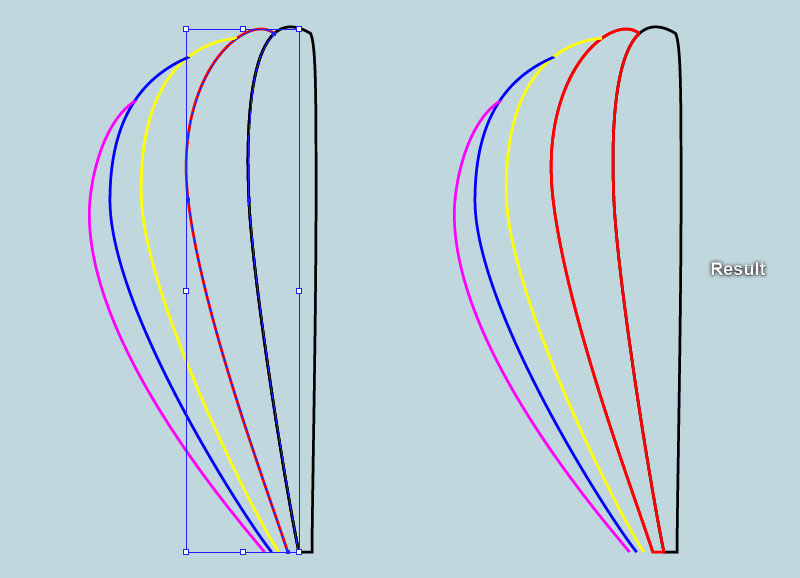
Select the black path and make a copy (Ctrl +C, Ctrl +F) of it. Keep this copy selected, hold down the Shift and click on the white path. Then go to the Object > Path > Join (Ctrl +J). Continue press (Ctrl +J) to get the result like you see in the second image. Focus on the third image, select the black path, then pick the Add Anchor Point Tool (+) and click on the left point highlighted with white. This will add a new anchor point for the black path.
選擇黑色路徑並複製及貼至上層(Ctrl +C,Ctrl +F)。保持此複本處於選中狀態,按住Shift並單擊白色路徑。然後轉到「物件→路徑→合併」(Ctrl +J)。繼續按合併(Ctrl +J)以獲得如第二張圖所示的結果。聚焦在第三張圖像上,選擇黑色路徑,然後選擇增加錨點工具(+)並單擊如圖所示白色突出顯示的左側點。這將為黑色路徑添加一個新的錨點。
Next, select and remove the right anchor point highlighted with white.
接下來,選擇並刪除如圖所示白色突出顯示的右錨點。
Before you continue, select the red path and make a copy of it. Still having this copy selected, hold down the Shift and click on the black path. Then press (Ctrl +J) twice to connect these two paths.
在繼續之前,選擇紅色路徑並複製它。仍然選擇此複本,按住Shift並單擊黑色路徑。然後按兩次(Ctrl +J)將這兩個路徑連接起來。
Make sure that the resulting object is still selected, press (Ctrl +Left Square Bracket) to hide it behind the red original path.
確保生成的對象仍處於選中狀態,按下「物件→排列順序→置後」(Ctrl +[)將其隱藏在紅色原始路徑後面。
步驟4
Focus on the first image, select the red path, then pick the Add Anchor Point Tool (+) and click on the left point highlighted with white. This will add a new anchor point for the red path. Select and remove the right anchor point highlighted with white. Before you continue, select the yellow path and make a copy (Ctrl +C, Ctrl +F) of it.
聚焦在第一個圖像上,選擇紅色路徑,然後選擇增加錨點工具(+)並單擊用白色突出顯示的左側點。這將為紅色路徑添加新的錨點。選擇並刪除用白色突出顯示的右側錨點。在繼續之前,選擇黃色路徑並複製(Ctrl +C,Ctrl +F)它。
Still having this copy selected, hold down the Shift and click on the red path. Right-click on the artboard and then select the Join section from the drop-down menu. Right-click on the artboard again, then select the Join section.
仍然選擇這個複本,按住Shift鍵並單擊紅色路徑。右鍵單擊畫板,然後從下拉菜單中選擇連接部分。再次右鍵單擊畫板,然後選擇連接部分。
Make sure that the resulting object is still selected, press (Ctrl +Left Square Bracket) to hide it behind the yellow original path.
確保生成的對象仍處於選中狀態,按下(Ctrl +Left Square)將其隱藏在黃色的原始路徑後面。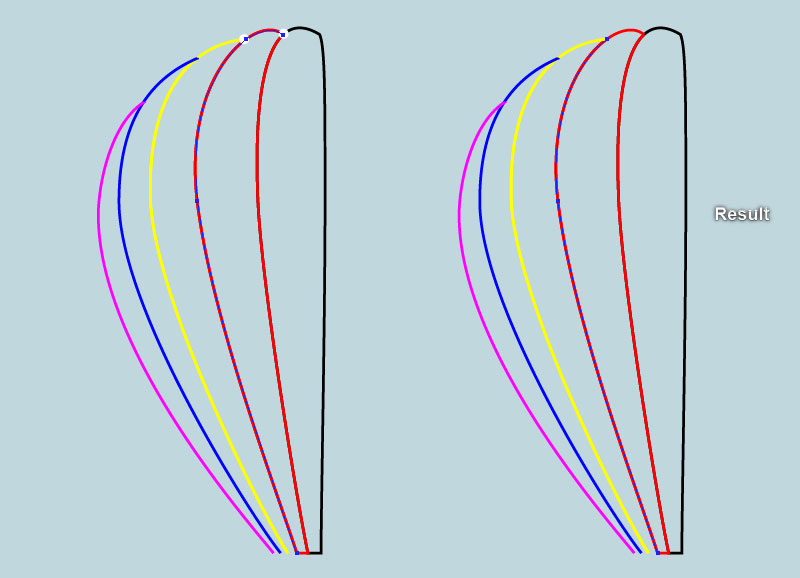
步驟5
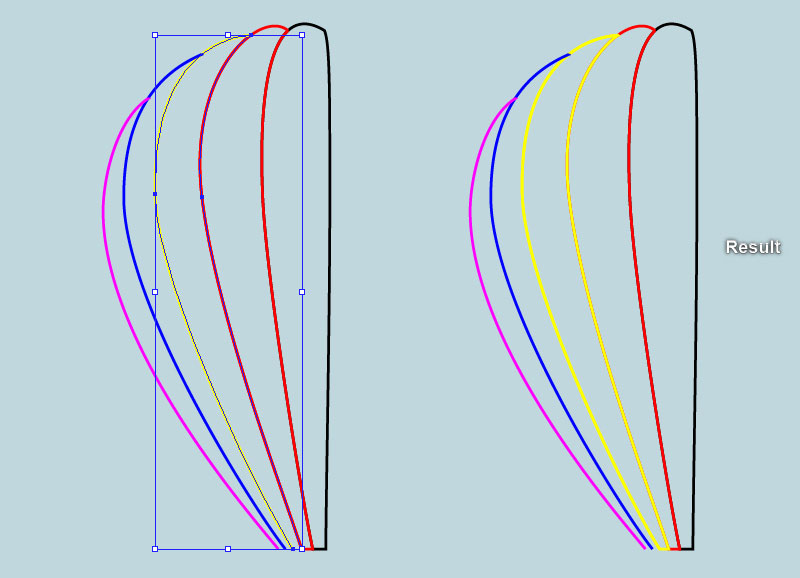
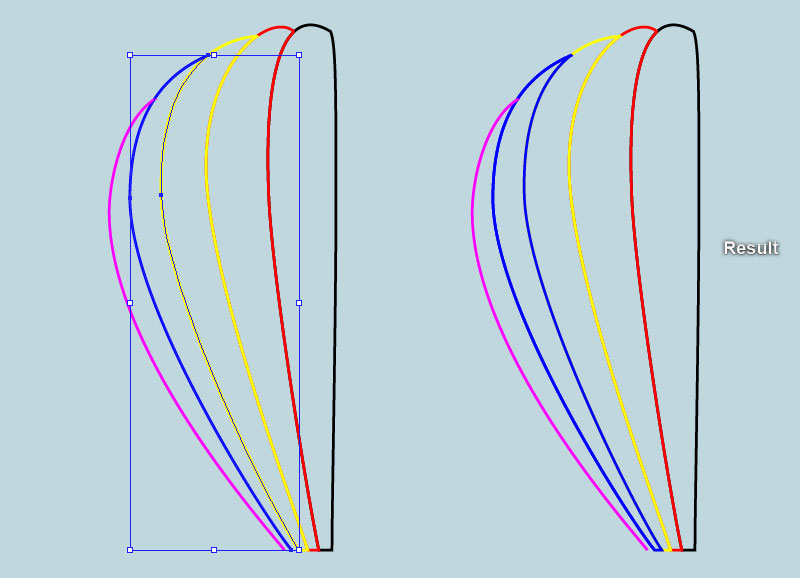
Focus on the first image, select the yellow path, then pick the Add Anchor Point Tool (+) and click on the left point highlighted with white. This will add a new anchor point for the yellow path. Select and remove the right anchor point highlighted with white.
聚焦在第一個圖像上,選擇黃色路徑,然後選擇增加錨點工具(+)並單擊用白色突出顯示的左側點。這將為黃色路徑添加一個新的錨點。選擇並刪除用白色突出顯示的右錨點。
Before you continue, select the blue path and make a copy (Ctrl +C, Ctrl +F) of it. Still having this copy selected, hold down the Shift and click on the yellow path. Then press (Ctrl +J) twice to connect these two paths. Make sure that the resulting object is still selected, press (Ctrl +Left Square Bracket) to hide it behind the blue original path.
在繼續之前,選擇藍色路徑並複製(Ctrl +C,Ctrl +F)。仍然選擇此複本,按住Shift並單擊黃色路徑。然後按(Ctrl +J)兩次以連接這兩個路徑。確保生成的對象仍處於選中狀態,按下(Ctrl +Left Square)將其隱藏在藍色原始路徑後面。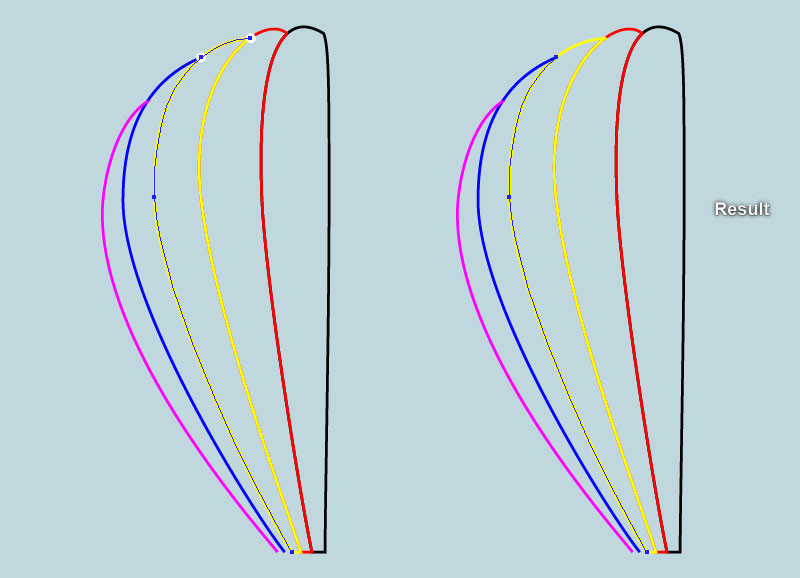
步驟6
Focus on the first image, select the blue path, then pick the Add Anchor Point Tool (+) and click on the left point highlighted with white. This will add a new anchor point for the blue path. Next, select and remove the right anchor point highlighted with white.
聚焦在第一個圖像上,選擇藍色路徑,然後選擇增加錨點工具(+)並單擊用白色突出顯示的左側點。這將為藍色路徑添加一個新的錨點。接下來,選擇並刪除用白色突出顯示的右錨點。
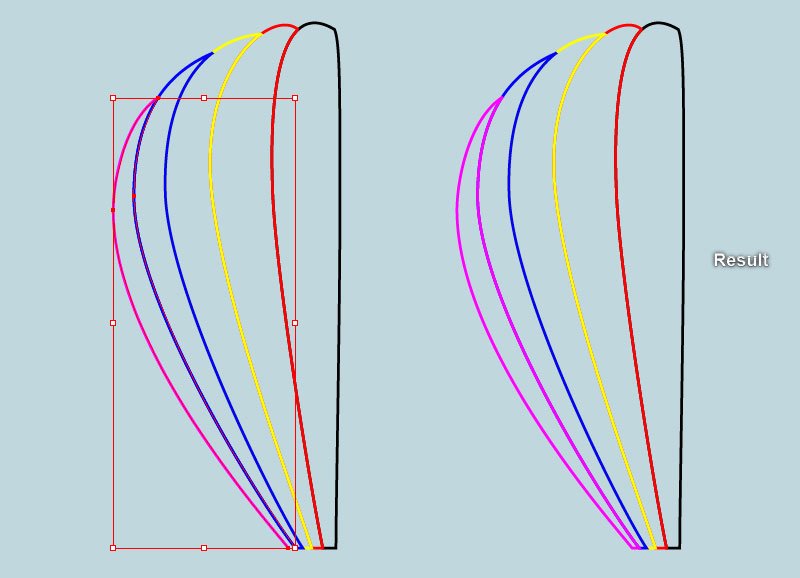
Now select the magenta path, hold down the Shift and click on the blue path. Right-click on the artboard and then select the Join section from the drop-down menu. Next right click on the artboard again, then select the Join section.
現在選擇洋紅色路徑,按住Shift鍵並點擊藍色路徑。右鍵點擊畫板,然後從下拉菜單中選擇連接部分。接下來再次右鍵單擊畫板,然後選擇連接部分。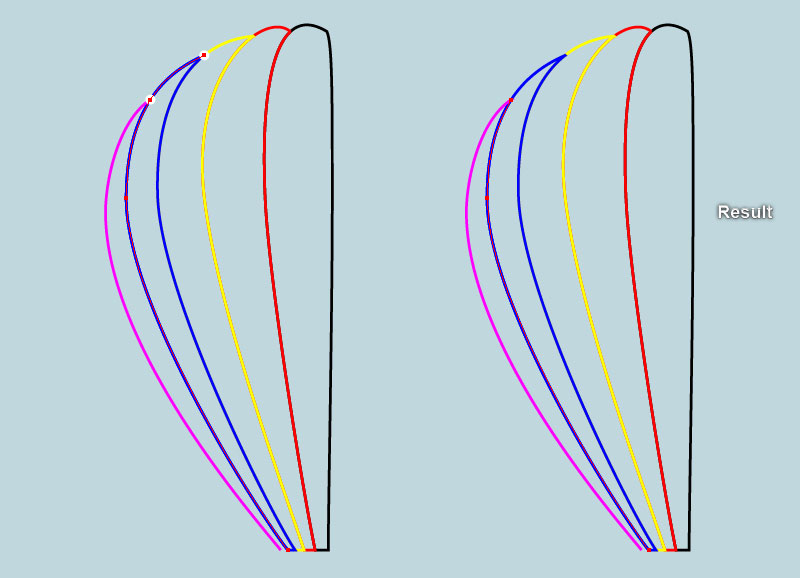
步驟7
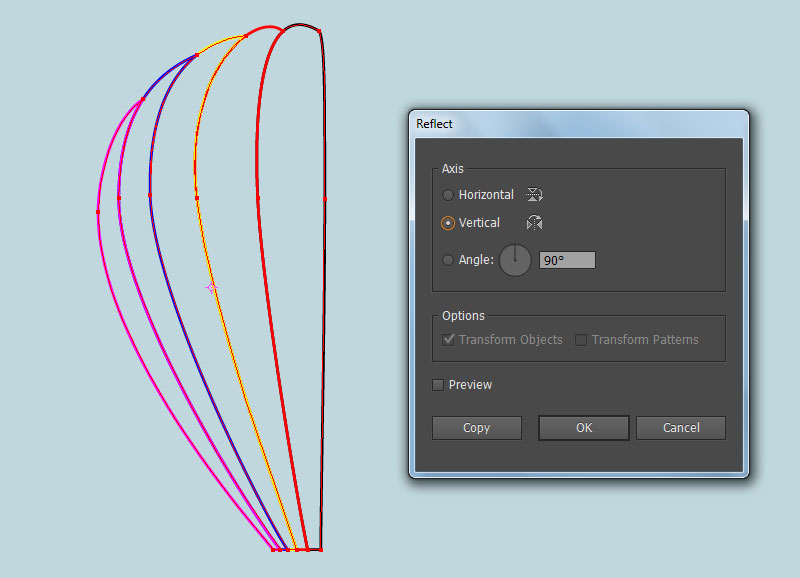
Select five objects created in the previous steps and go to the Object > Transform > Reflect… Check the Vertical and click Copy. Drag the copies we have just created to the right and place them as shown in the second image. Don’t forget to hold the Shift key on the keyboard for straight dragging.
選擇在前面步驟中創建的五個物件,然後轉到物件>變形>鏡射...檢查垂直,然後單擊複製。將我們剛剛創建的複本拖到右側,並將其放置在第二張圖中。不要忘記按住鍵盤上的Shift鍵進行直線拖動。
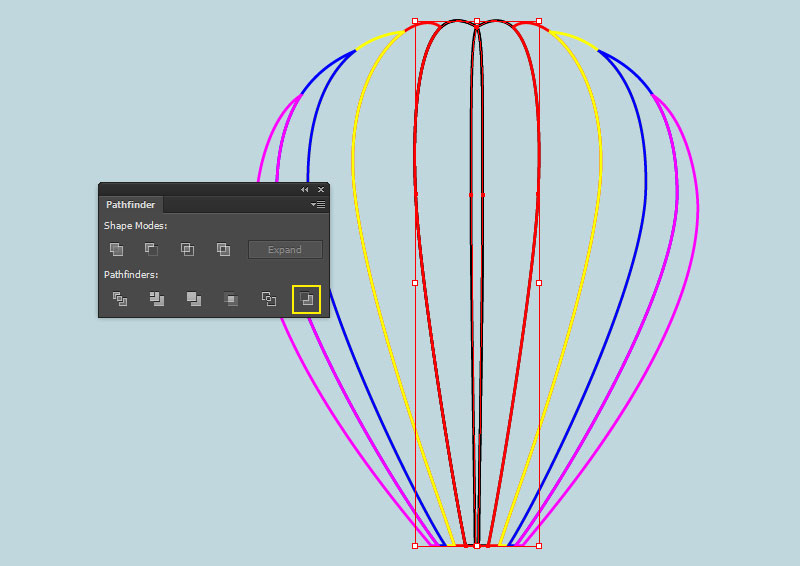
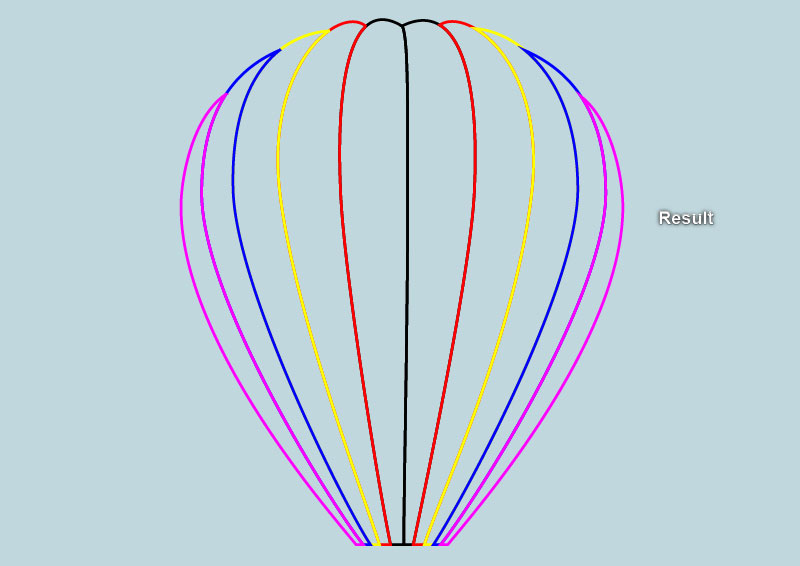
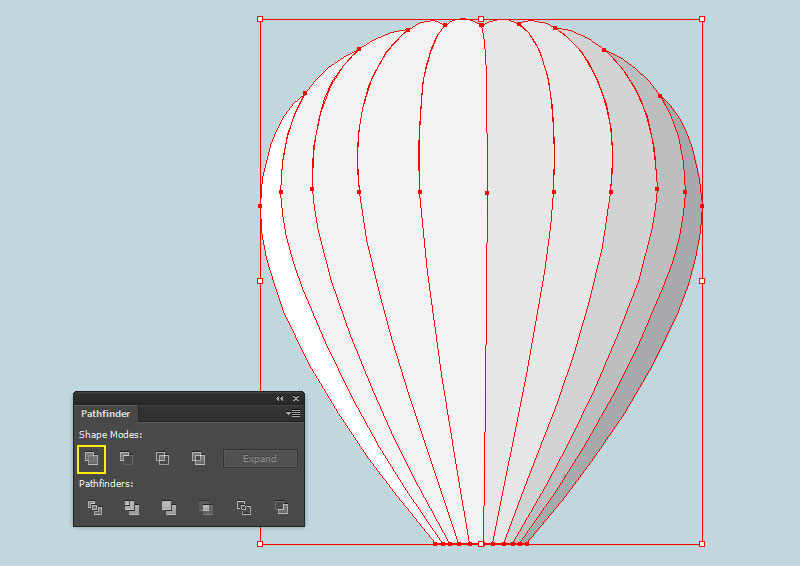
Now select the left black object and make a copy (Ctrl +C, Ctrl +F) of it. Keep this copy selected, hold down the Shift and click on the right black object. Then open the Pathfinder panel (Window > Pathfinder) and click on the Minus Back button. At this point, your objects should look like in the last image.
現在選擇左邊的黑色物件並複製它(Ctrl +C,Ctrl +F)。保持此複本處於選中狀態,按住Shift鍵並單擊右邊的黑色物件。然後打開路徑管理員面板(視窗>路徑管理員)並單擊依後置物件剪裁按鈕。在這一點上,你的物件應該看起來像在最後一個圖像。
提示:裁減後的圖案若是不正確,那是物件排列順序不正確,請將右側黑色物件變更物件順序為移至最前。
步驟8
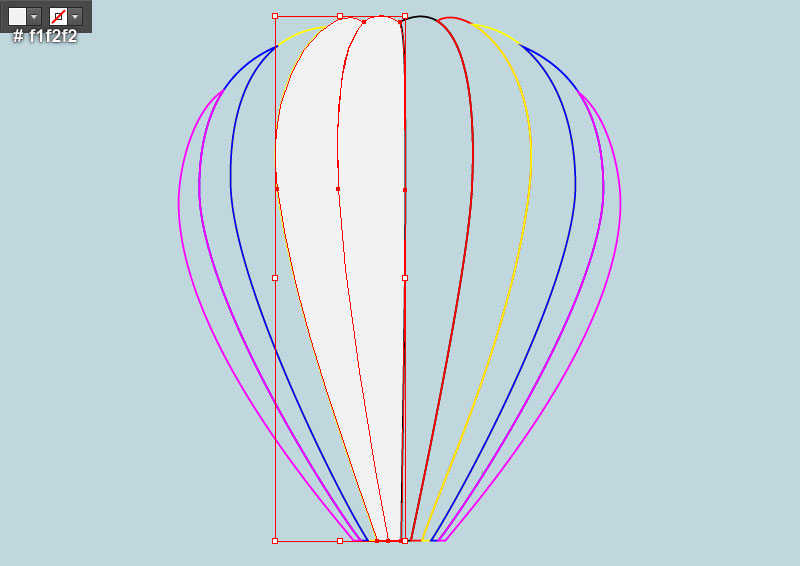
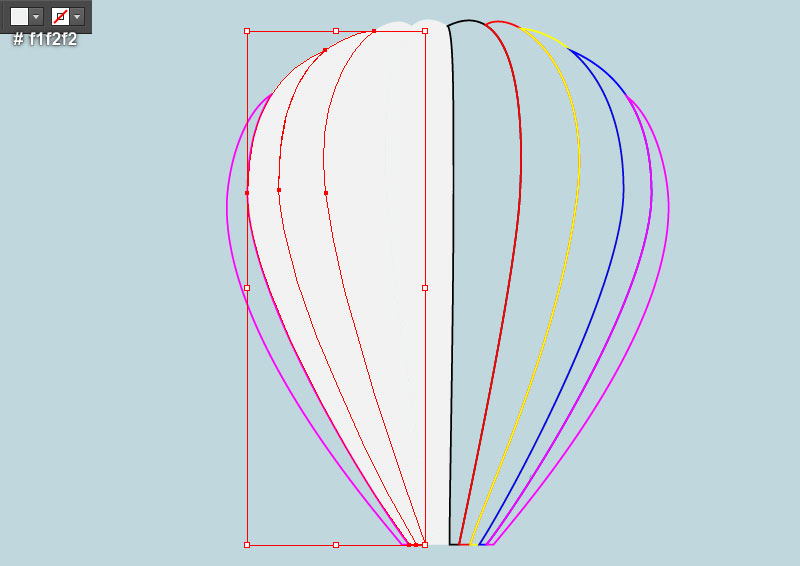
Focus on the left part of the hot air balloon, select the black and the red objects and remove their strokes, then fill them with light grayish cyan (#f1f2f2). Continue to select the yellow and the blue objects, remove their strokes and fill them with light grayish cyan (#f1f2f2).
聚焦在熱氣球的左邊部分,選擇黑色和紅色物件並刪除(設定為無框線)它們的筆畫,然後用淺灰色填充它們(#f1f2f2)。繼續選擇黃色和藍色的對象,刪除它們的筆劃,並用淺灰色填充它們(#f1f2f2)。
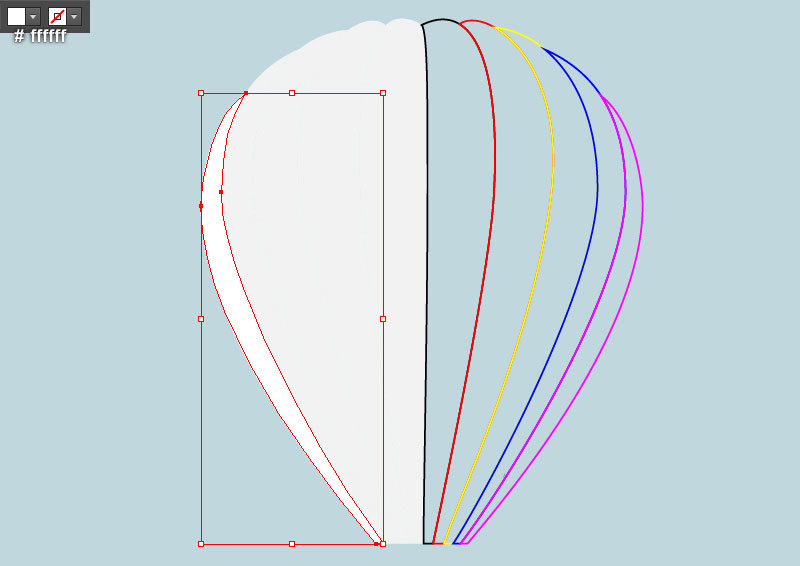
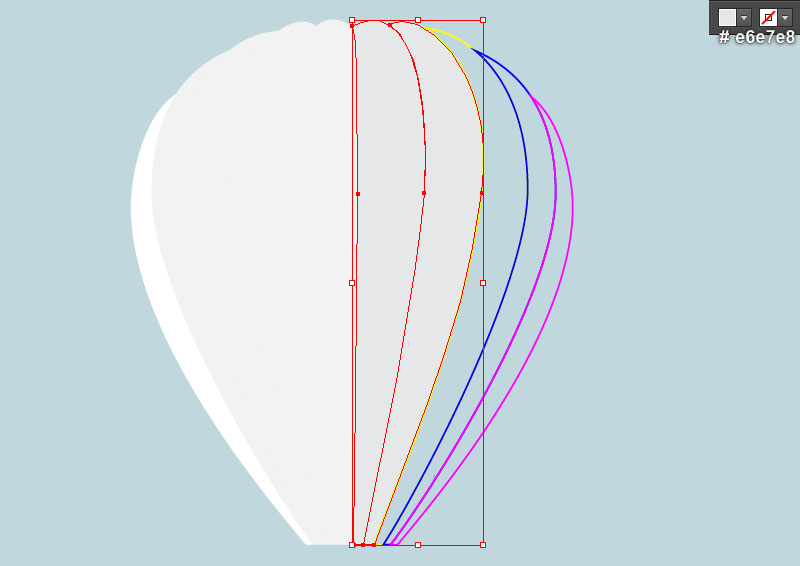
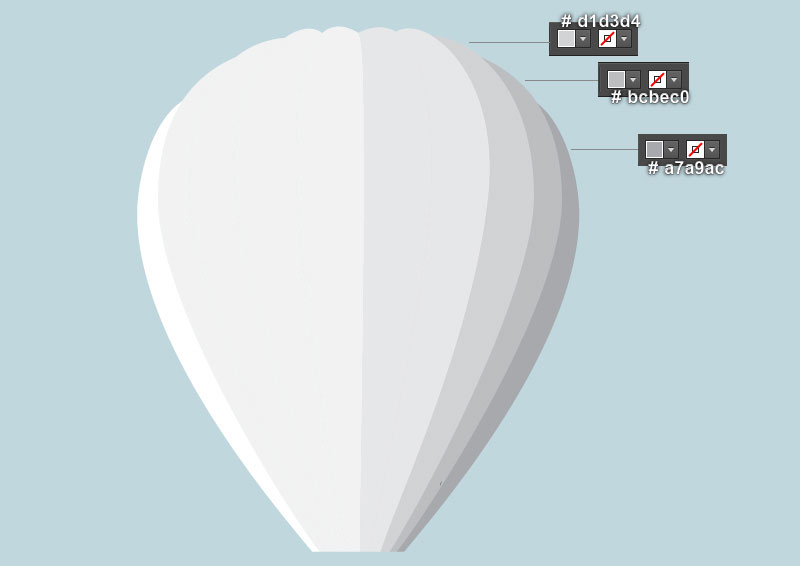
Next, select the magenta object, remove its stroke and fill this object with white (#ffffff). Likewise, repeat the same process to fill colors for the five objects of the right part of the hot air balloon. In the end, your shapes should look like the last image shown.
接下來,選擇洋紅色對象,刪除其描邊並使用白色(#ffffff)填充此物件。同樣,重複相同的過程,為熱氣球右側的五個物件填充顏色。最後,您的形狀應該看起來像最後顯示的圖像。
步驟9
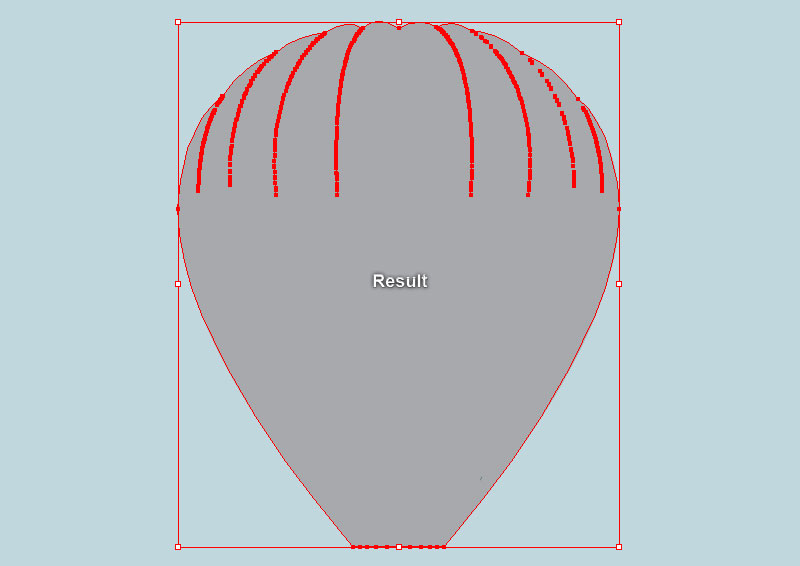
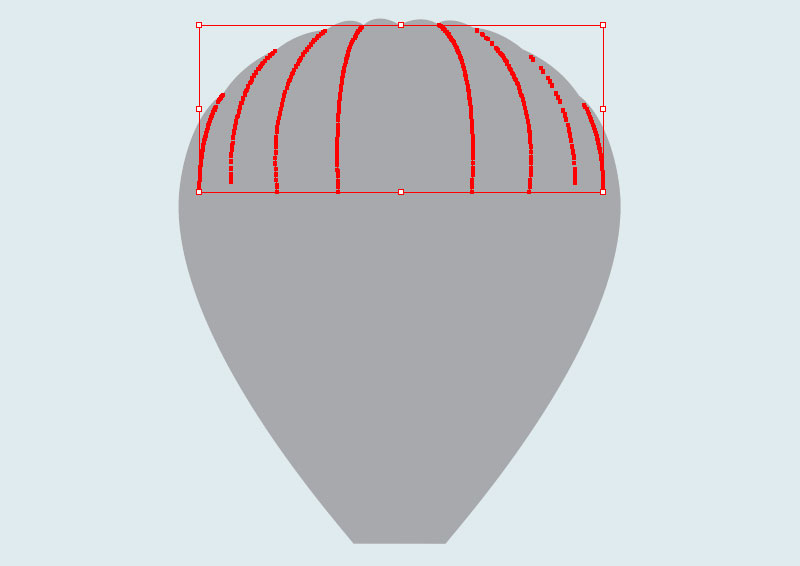
Select all shapes of the hot air balloon and make a copy (Ctrl +C, Ctrl +F) of them. Still having these copies selected, open the Pathfinder panel (Window > Pathfinder) and click on the Unite button. With the help of the Selection Tool (V), double-click twice on the newly created group. Select objects as shown in the third image and remove them. Then double-click on the anywhere outside of the group just edited.
選擇熱氣球的所有形狀並複製(Ctrl +C,Ctrl +F)它們。仍然選擇這些複本,打開路徑管理員面板(視窗>路徑管理員)並單擊「聯集」按鈕。建議使用形狀建立工具合併熱氣球圖形。
在選擇選擇工具(V)的幫助下,雙擊新創建的組。如第三張圖所示選擇物件並將其刪除。然後雙擊剛剛編輯的組之外的任何位置,已退出群組編輯。
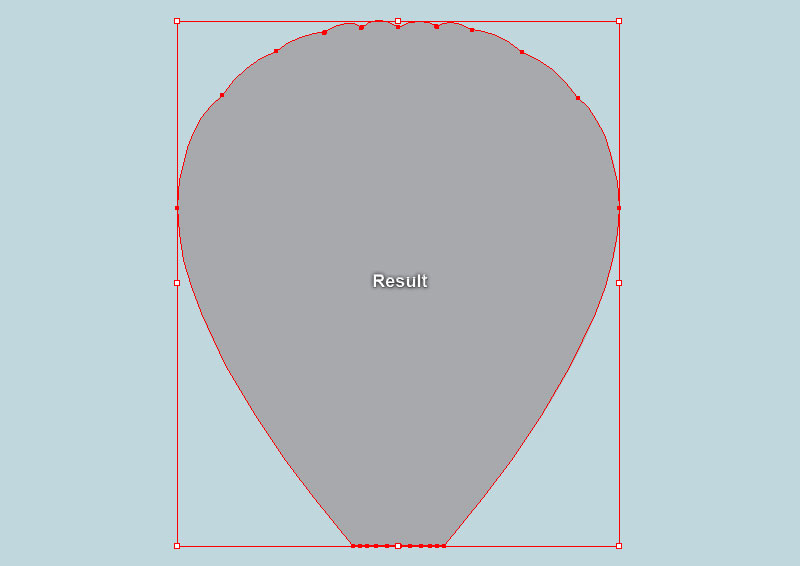
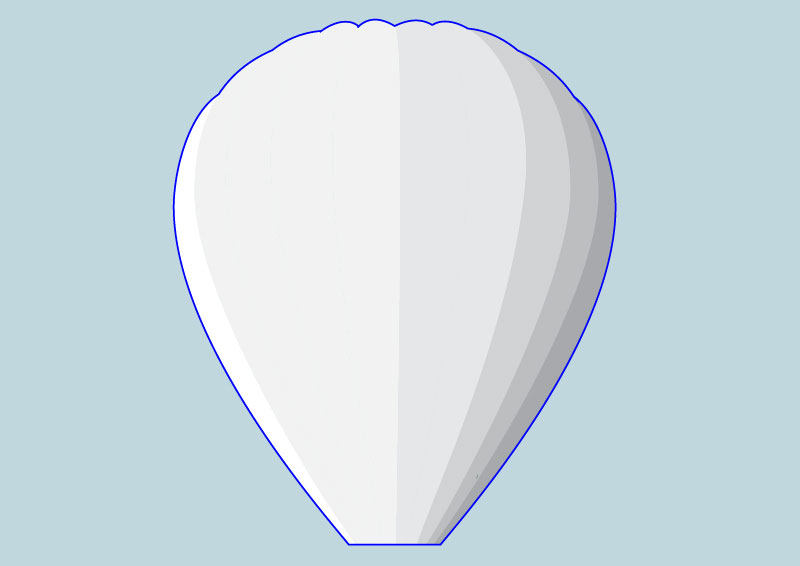
Reselect this group and press (Ctrl +Shift +G) to ungroup it. Now select the newly created shape and remove the fill color of it, then add a blue stroke for this object.
重新選擇此組並按(Ctrl +Shift +G)取消組合。現在選擇新創建的形狀並刪除其填充顏色,然後為此對象添加藍色筆劃。
步驟10 3D外觀
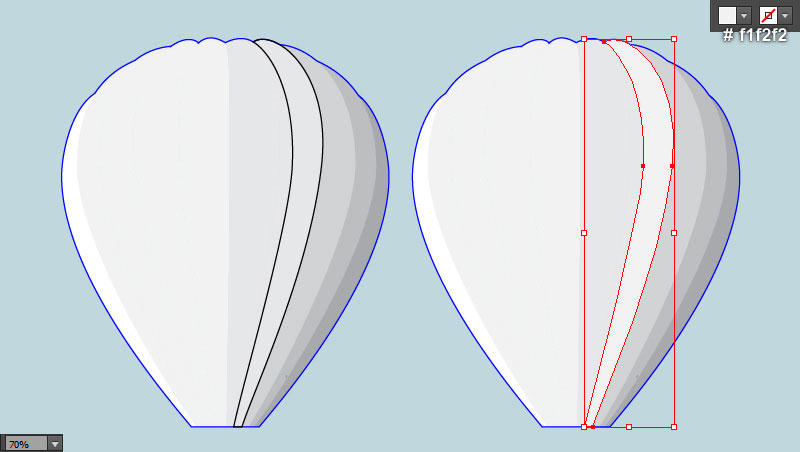
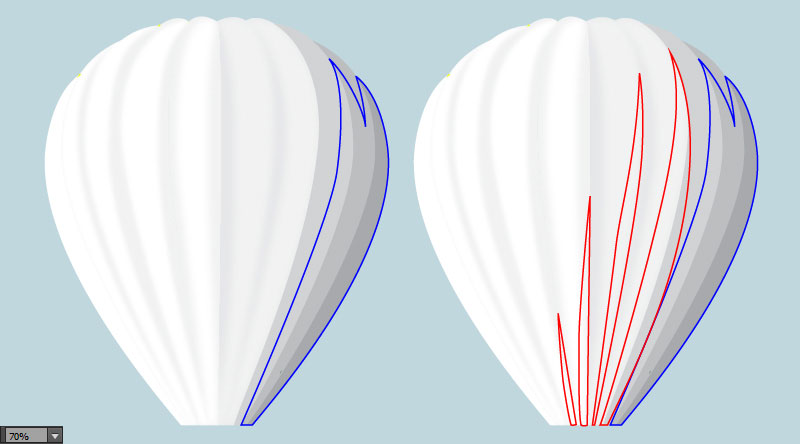
We are going to start making highlights and shadows on the hot air balloon to give it more of a 3D look. Pick the Pen Tool (P) and create a black object like you see in the first image. Once your object is drawn, remove its stroke and fill this object with light grayish cyan (#f1f2f2).
我們將開始在熱氣球上製作高光和陰影,以使其更具3D外觀。選擇筆形(鋼筆)工具(P),創建一個黑色的物體,就像你在第一張圖片中看到的那樣。一旦你的物件被繪製出來,移除它的描邊(筆畫),並用淺灰色填充這個物件(#f1f2f2)。
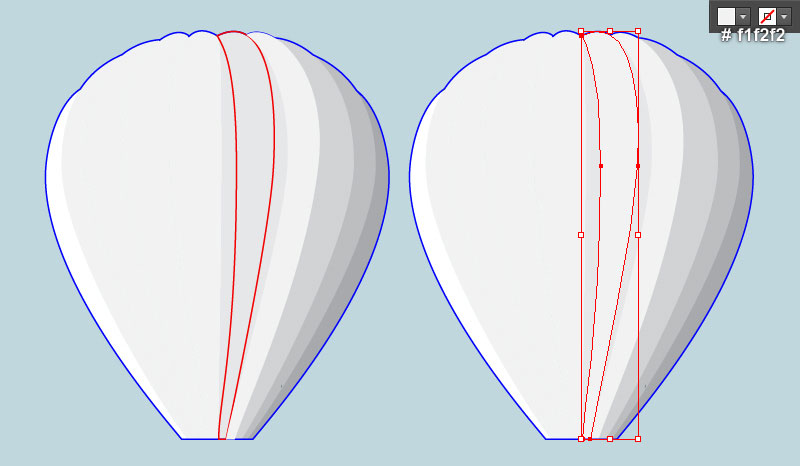
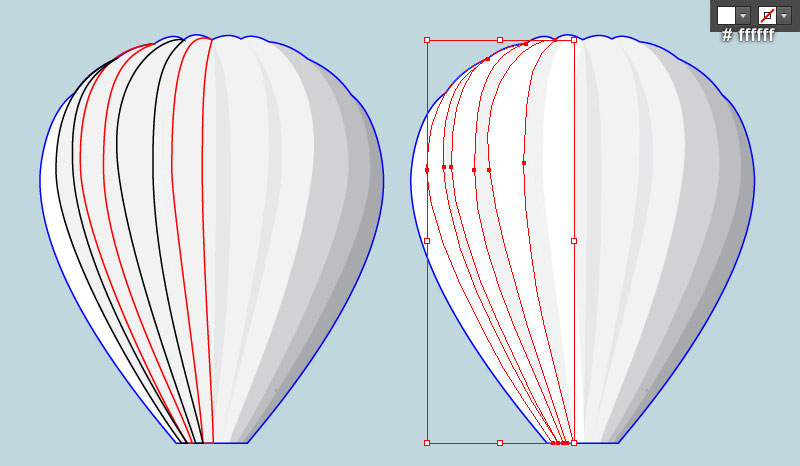
Continue using the Pen Tool (P), create a light grayish cyan shape (# f1f2f2) as shown in the third and the fourth images. Likewise, repeat the same process to create three white shapes (#ffffff) like you see in the last two images.
繼續使用鋼筆工具(P),創建一個淺灰色的形狀(# f1f2f2),如第三和第四張圖片所示。同樣,重複相同的過程,創建三個白色形狀(#ffffff),就像你在最後兩個圖像中看到的那樣。
使用3D效果製作熱氣球3D外觀:
- 將灰階熱氣球所在圖層命名為灰階熱氣球。
- 新增一個新圖層,命名為彩色熱氣球。
- 調整彩色熱氣球圖層至灰階熱氣球圖層下方。
- 將全部灰階熱氣球的物件複製一份,原地貼上在彩色熱氣球圖層。
- 給每一個彩色熱氣球的組成物件填上不同色彩。
- 給每一個彩色熱氣球的組成物件加上「效果→3D和素材→膨脹」。各項設定值:光源選擇為擴散,深度10,音量60%,勾選兩側膨脹。
Step 11步驟11
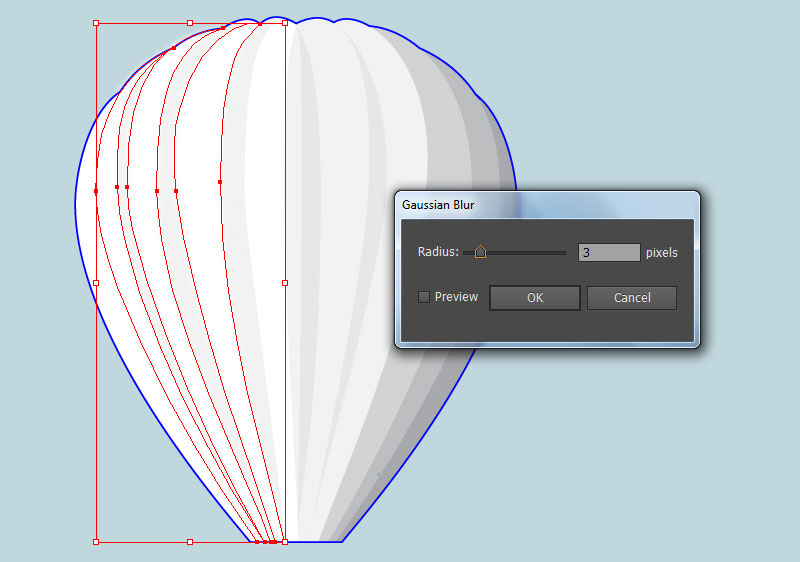
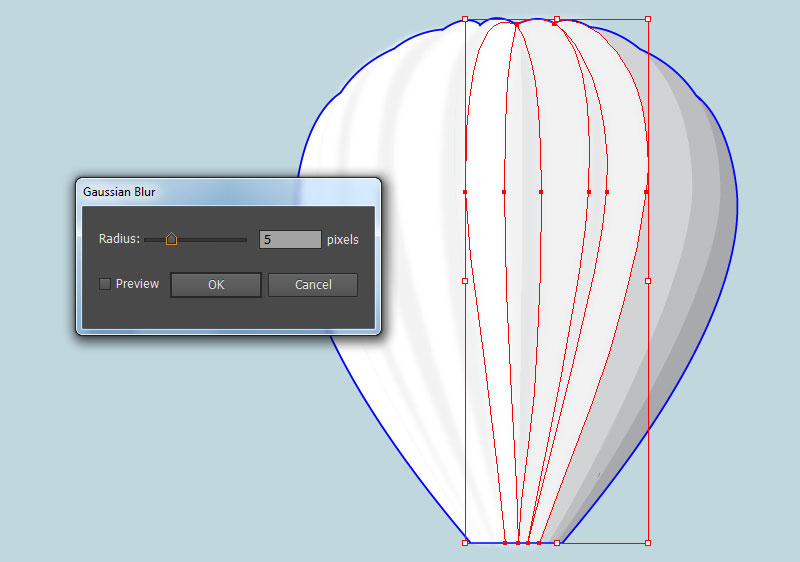
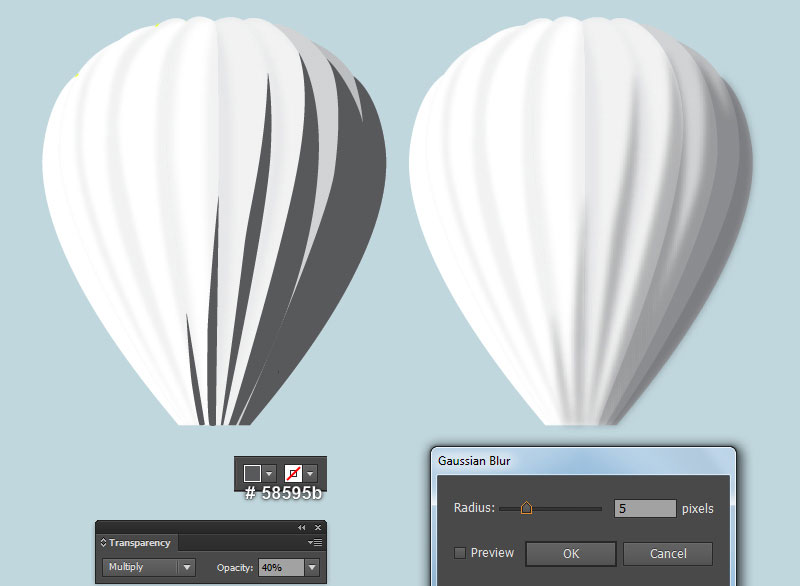
Select three shapes like you see in the first image and go to the Effect > Blur > Gaussian Blur… Enter a 3px Radius and click OK. Select three shapes as shown in the second image and apply a 5px Gaussian Blur effect for them.
選擇三個形狀,就像你在第一個圖像中看到的,然後轉到效果>模糊>高斯模糊.輸入一個3px半徑,然後單擊確定。選擇三個形狀,如第二張圖所示,並為它們應用5px高斯模糊效果。
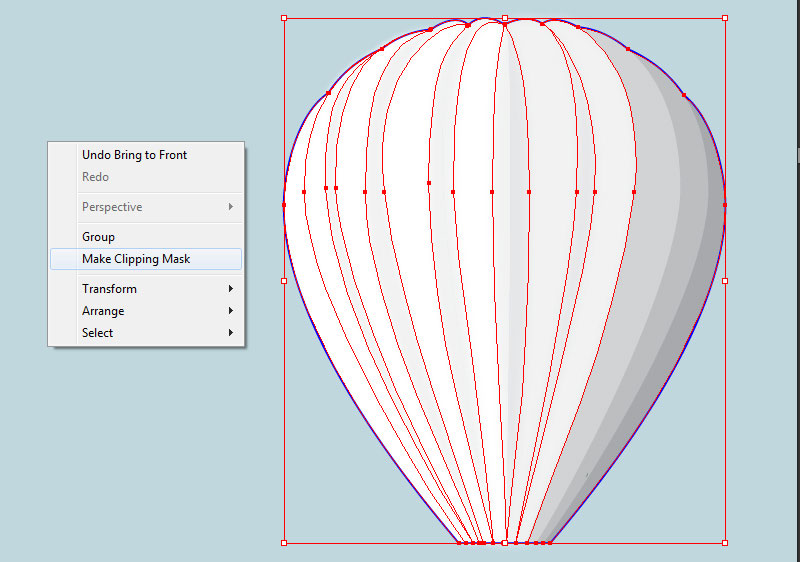
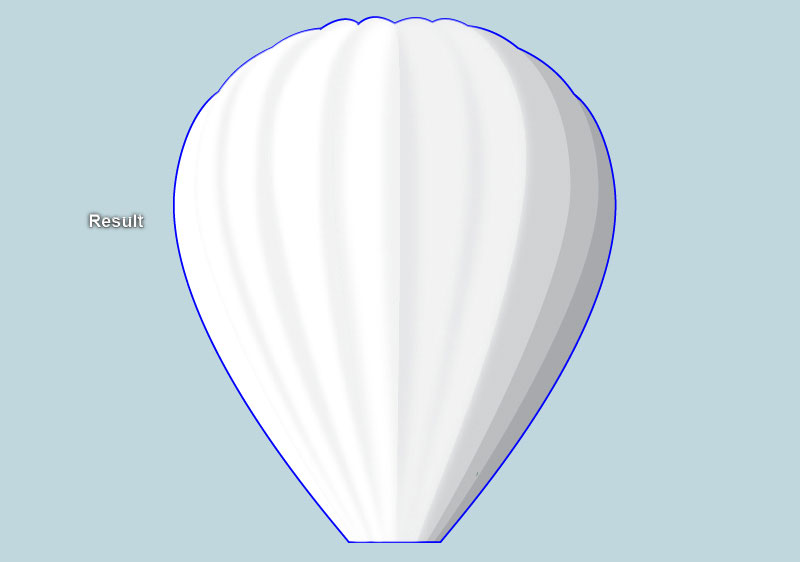
Before you continue, select five shapes with blur effects applied in this step and press (Ctrl +G) to group them. Now select the blue object created in step 9 and make a copy (Ctrl +C, Ctrl +F) of it. Keep this copy selected, hold down the Shift and click on the newly created group. Right-click on the artboard and then select the Make Clipping Mask section from the drop-down menu.
繼續之前,請選擇在此步驟中應用了模糊效果的五個形狀,然後按(Ctrl +G)將它們分組。現在選擇在第9步中創建的藍色對象並複製(Ctrl +C,Ctrl +F)它。保持此複本處於選中狀態,按住Shift鍵並單擊新創建的組。在畫板上單擊滑鼠右鍵,然後從下拉菜單中選擇「製作剪裁蒙版」部分。
步驟12 製作熱氣球右側陰影
Pick the Pen Tool (P) and create five objects like you see in the first and the second images. Once your objects are drawn, reselect them and remove their strokes, then fill these objects with very dark grayish blue (#58595b).
選擇鋼筆工具(P)並創建五個對象,就像你在第一和第二張圖片中看到的那樣。繪製完對象後,重新選擇它們並刪除它們的筆畫,然後用非常深的灰藍色填充這些對象(#58595b)。
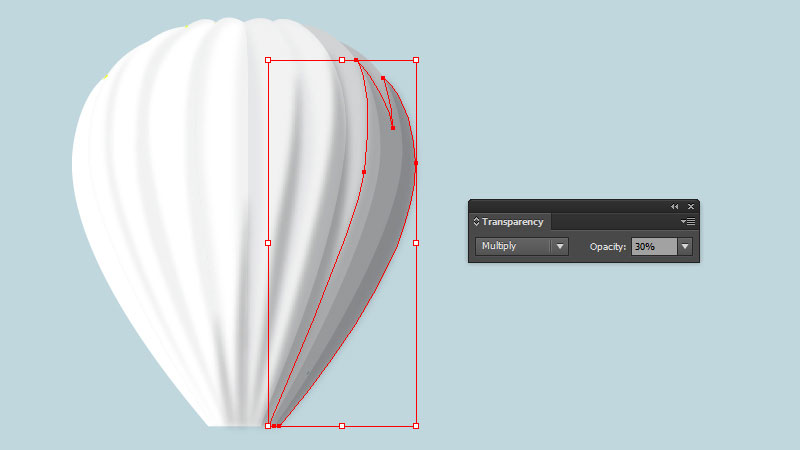
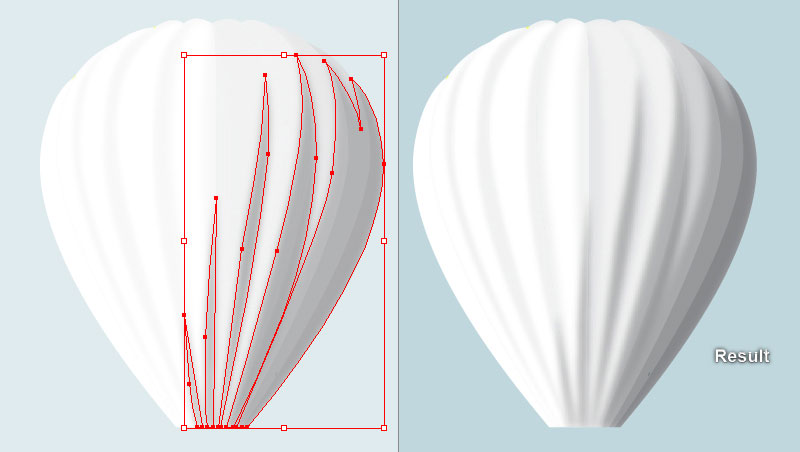
Apply a 5px Gaussian Blur effect for the resulting shape, then change the Blending Mode to Multiply and reduce their Opacity to 40%. Next, reselect the biggest shape with blur effect applied in this step and reduce its Opacity to 30%. Now select five shapes with blur effects applied in this step and press (Ctrl +X) to cut them. Then pick the Selection Tool (V), double-click on the clipping set created in step 11 and press (Ctrl +F) to paste the shapes that were cut in this step.
應用一個5px高斯模糊效果的結果形狀,然後改變混合模式,以相乘,並減少其不透明度為40%。接下來,重新選擇在這一步中應用模糊效果的最大形狀,並將其不透明度降低到30%。現在選擇在此步驟中應用了模糊效果的五個形狀,然後按(Ctrl +X)剪切它們。然後選擇選擇工具(V),雙擊在第11步中創建的剪切集,然後按(Ctrl +F)粘貼在這一步中剪切的形狀。
Finally, double-click on the anywhere outside of the clipping set.
最後,雙擊剪輯集之外的任意位置。
Step 13步驟13
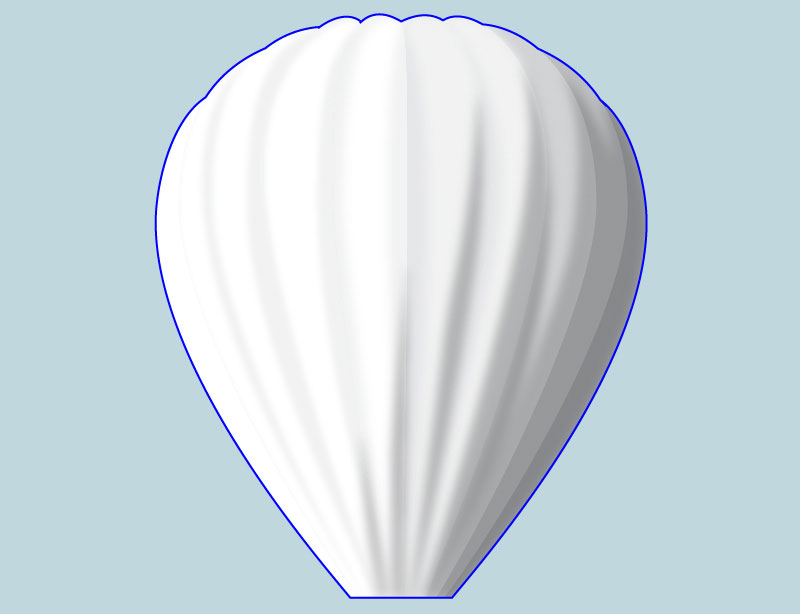
At this point your hot air balloon should look like in the next image:
此時,您的熱氣球應該看起來像下一個圖像:
步驟14 熱氣球分色圖案
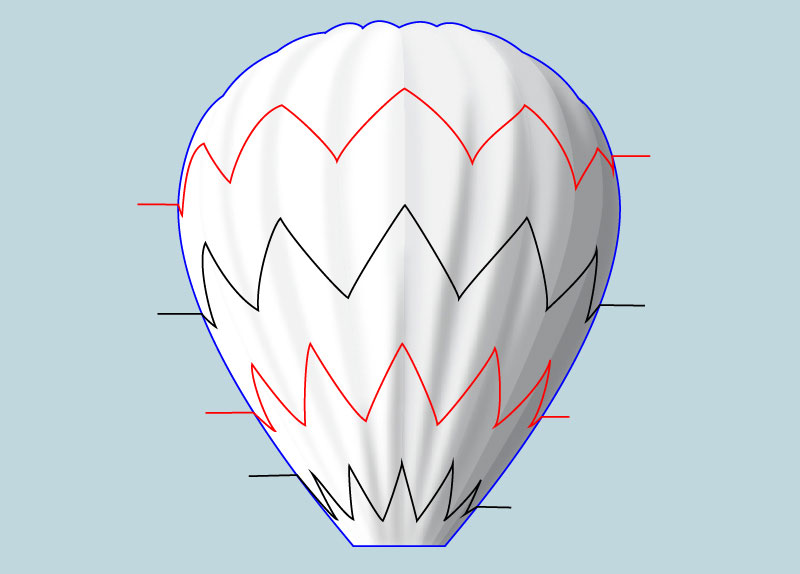
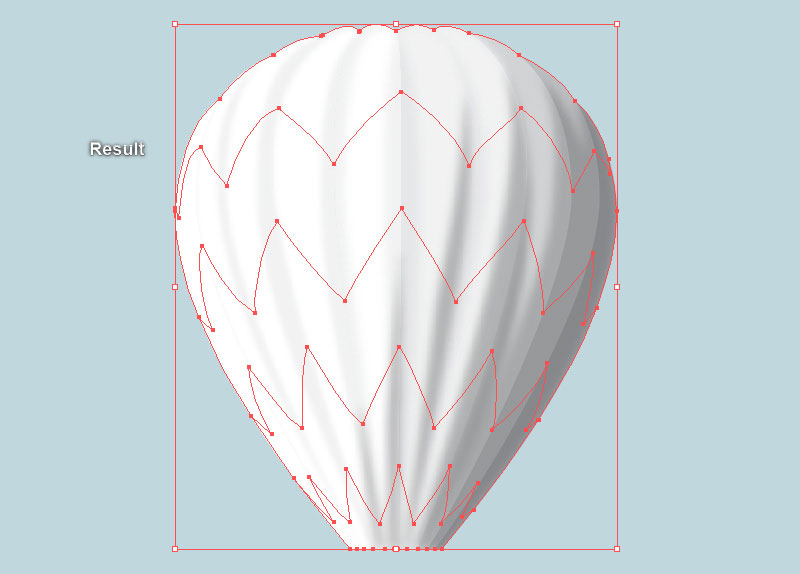
With the help of the Pen Tool (P), create four zig-zag paths like you see in the images below.
在鋼筆工具(P)的幫助下,創建四個鋸齒形路徑,就像你在下面的圖片中看到的那樣。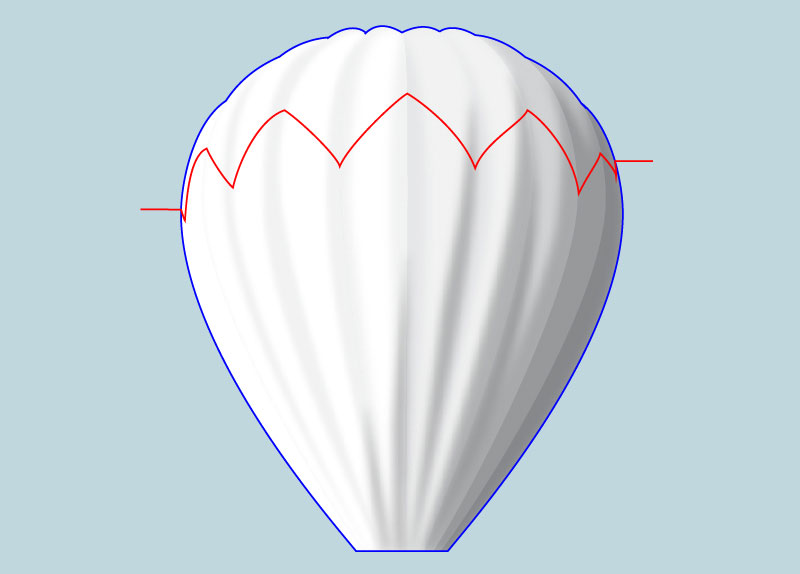
Step 15步驟15
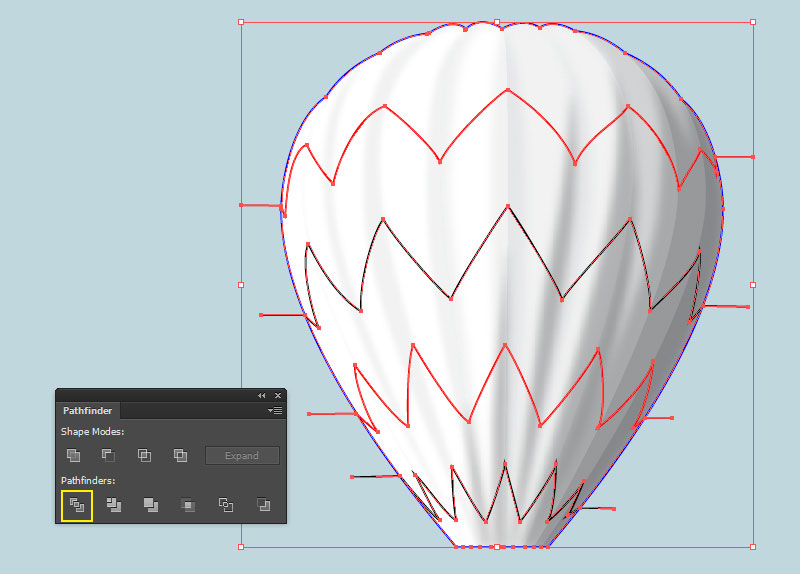
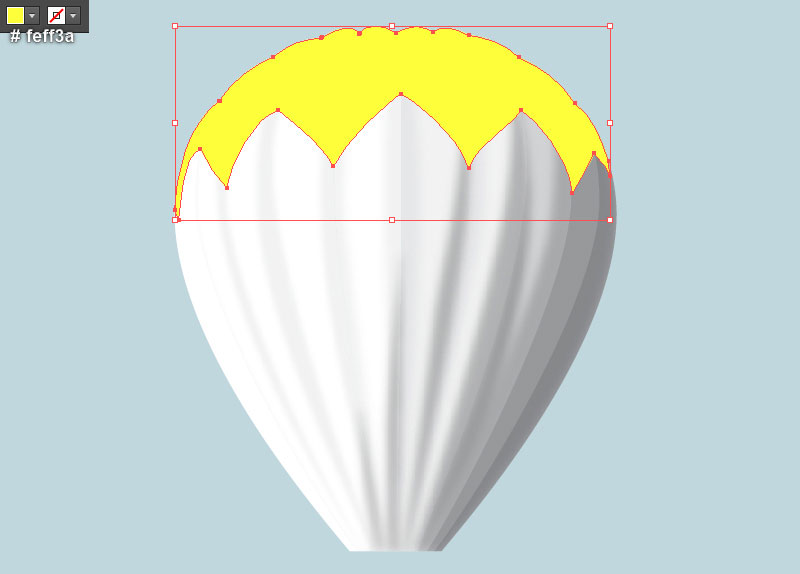
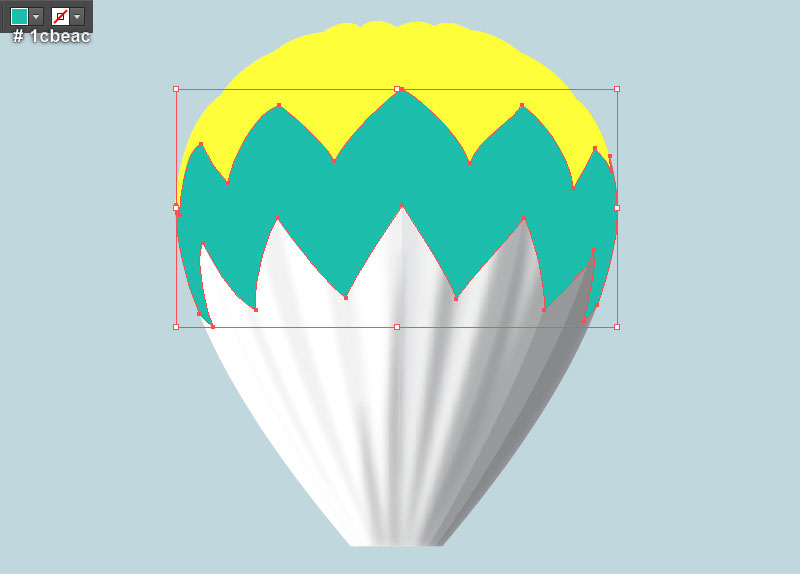
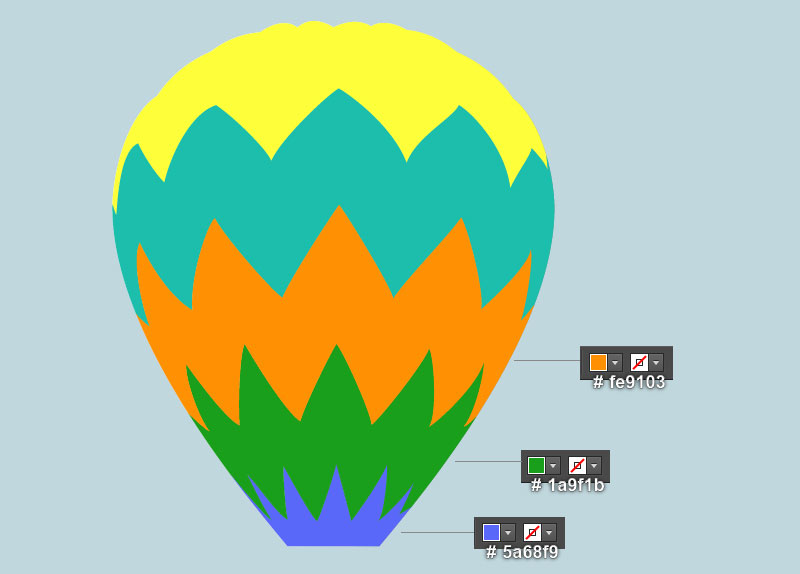
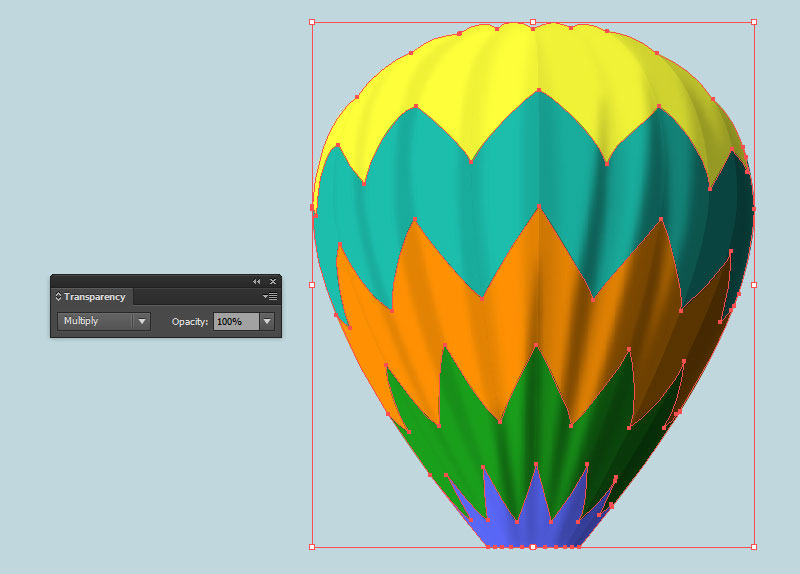
Once your zig-zag paths are drawn, reselect them and the blue object created in step 9. Then open the Pathfinder panel (Window > Pathfinder) and click on the Divide button. Keep the resulting group selected, press (Ctrl +Shift +G) to ungroup it. Focus on the third image, select the top object and fill it with light yellow (#feff3a).
一旦你的鋸齒形路徑被繪製出來,重新選擇它們和在第9步中創建的藍色對象。然後打開路徑查找器面板(窗口>路徑查找器)並單擊分割按鈕。保持選中結果組,按下(Ctrl +Shift +G)取消分組。聚焦第三張圖像,選擇頂部對象並使用淡黃色(#feff3a)填充。
Likewise, repeat the same process to fill colors for the remaining four objects created in this step. In the end, your new shapes should look like the next to last image shown. Finally, reselect the five shapes created in this step and change the Blending Mode to Multiply.
同樣,重複相同的過程,為在此步驟中創建的其餘四個對象填充顏色。最後,您的新形狀應該看起來像顯示的倒數第二個圖像。最後,重新選擇在這一步中創建的五個形狀,並將混合模式更改為相乘。
步驟16 製作熱氣球縫線
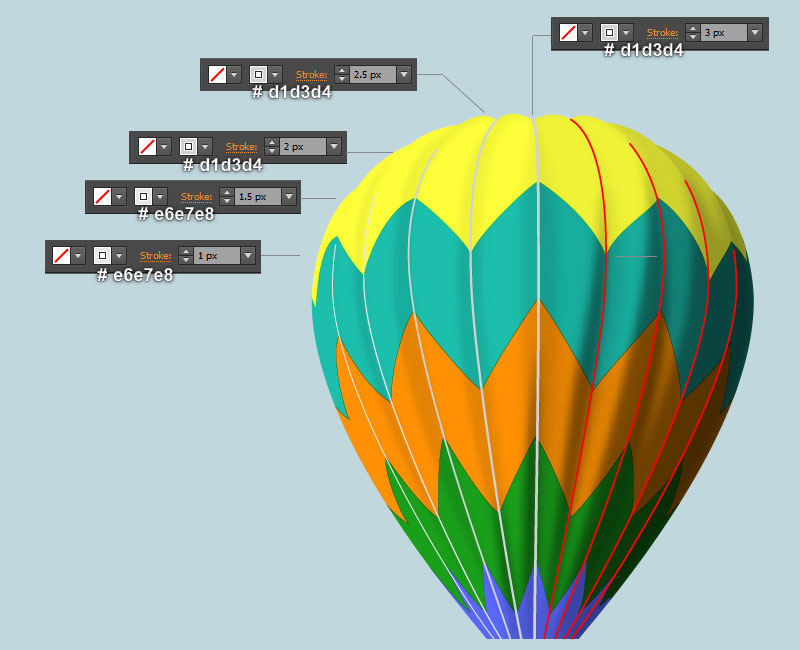
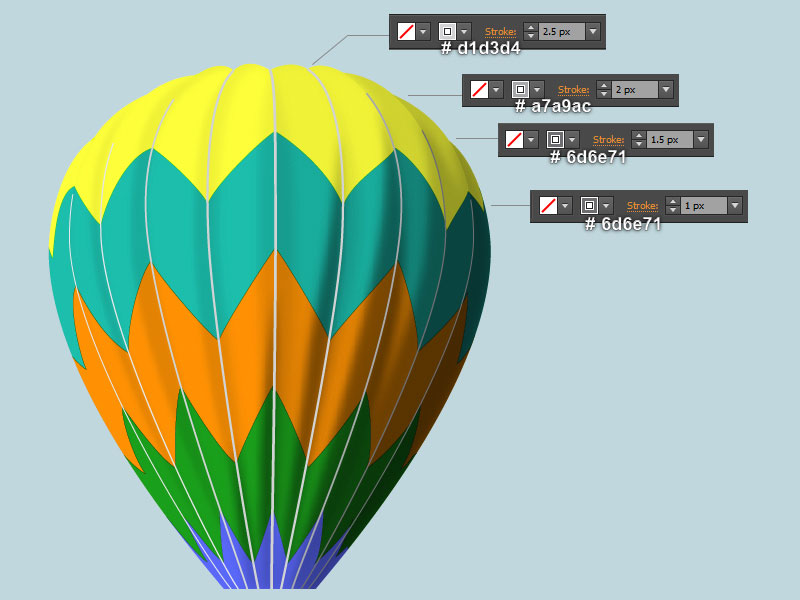
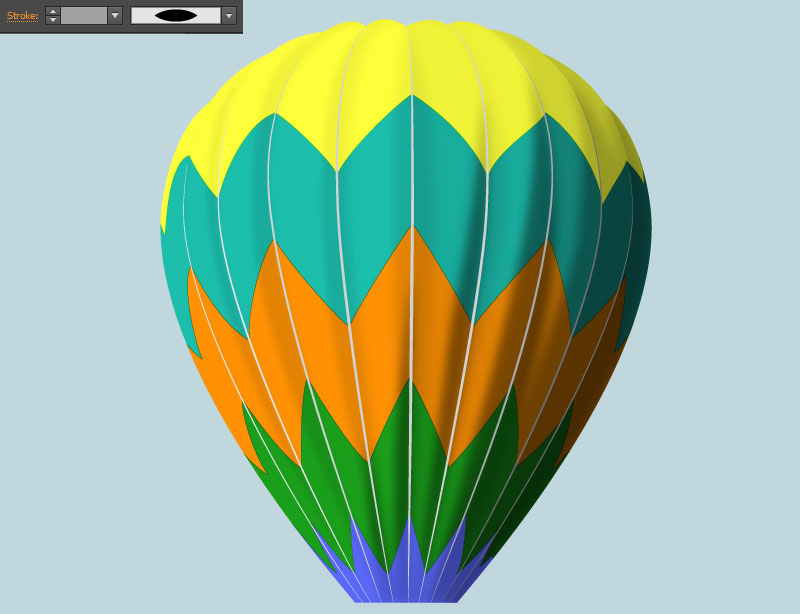
Pick the Pen Tool (P) and create nine curved paths like you see in the first image. Next focus on the second and the third images, change the stroke weight and replace the existing stroke colors of the newly created paths. Select all paths created in this step and apply the Width Profile 1 for them.
選擇鋼筆工具(P),創建九條曲線路徑,就像你在第一張圖中看到的那樣。接下來關注第二和第三個圖像,更改筆劃粗細並替換新創建路徑的現有筆劃顏色。選擇在此步驟中創建的所有路徑,並對其應用寬度輪廓1。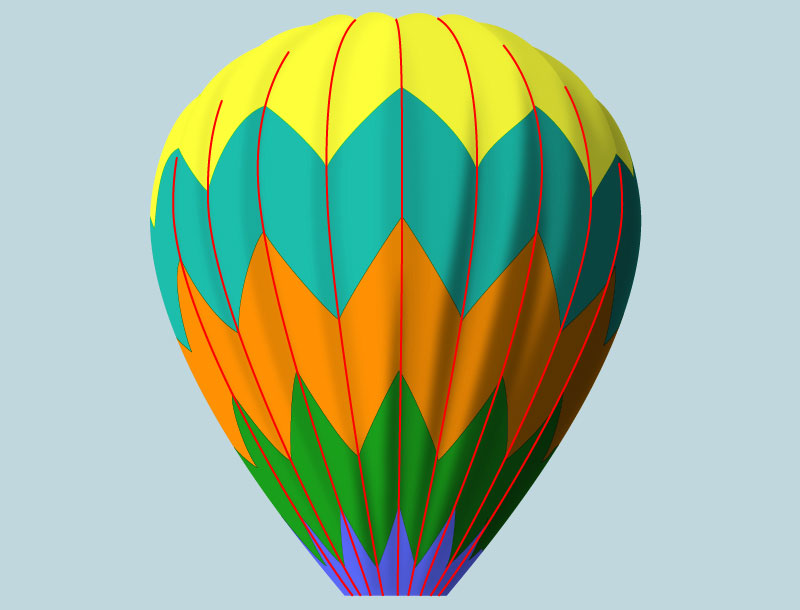
步驟17 製作陰影
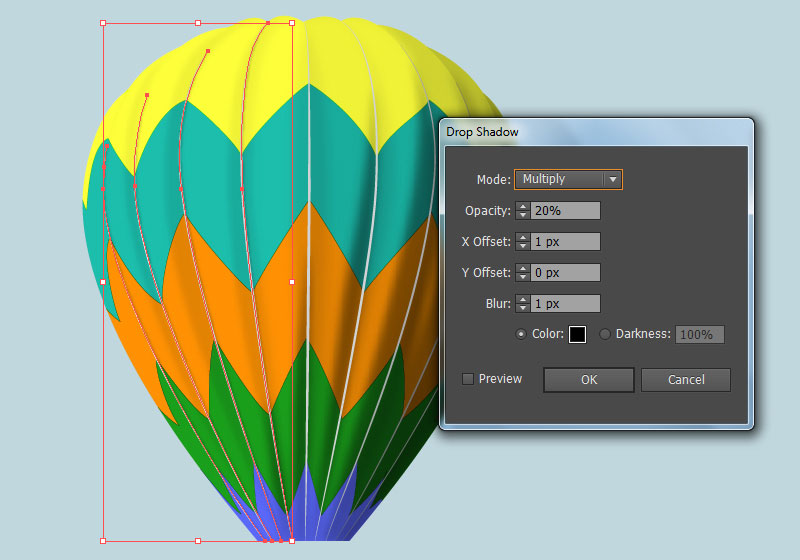
Select four left paths created in step 16 and go to the Effect > Stylize > Drop Shadow… Follow the data like you see in the first image and click OK.
選擇在步驟16中創建的四個左路徑,然後轉到效果>風格化>製作陰影.
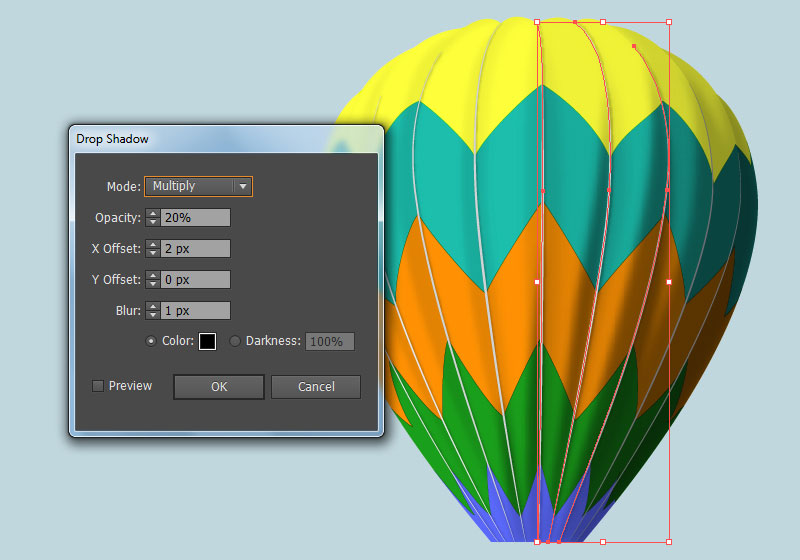
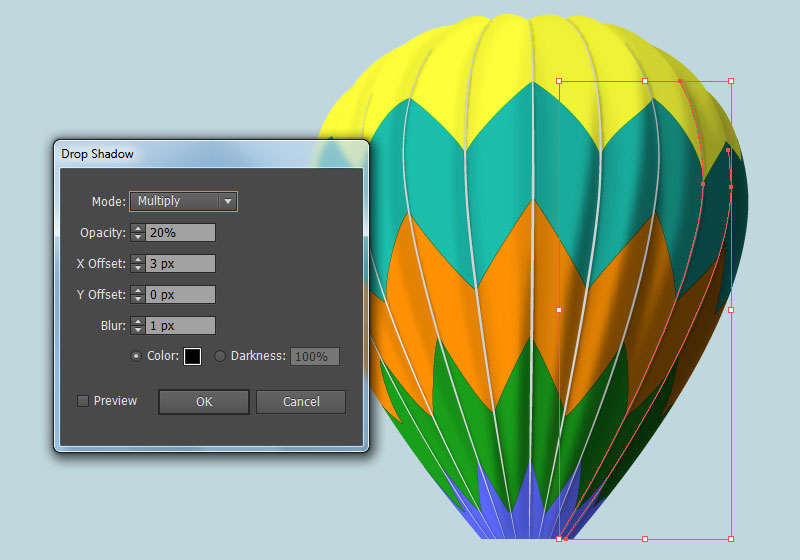
Next, select three paths as shown in the second image and open the Drop Shadow dialog box. Follow the data like you see in the second image and click OK. Focus on the last image, select the two remaining paths and then apply the Drop Shadow effect for them.
接下來,選擇三個路徑,如第二個圖像所示,並打開投影對話框。按照第二張圖中所示的數據進行操作,然後單擊OK。聚焦在最後一個圖像上,選擇剩下的兩個路徑,然後為它們應用投影效果。
步驟18 氣球的裙子
Next comes the skirt of the hot air balloon.
接下來是熱氣球的裙子。
Pick the Rectangle Tool (M) and create a 100 by 50px red rectangle, then place it in the position as shown in the first image. With the Direct Selection Tool (A), select the bottom-left anchor point of the newly created rectangle and move it 16px to the right. Select the bottom-right anchor point and move it 16px to the left.
選擇矩形工具(M),創建一個100 × 50像素的紅色矩形,然後將其放置在第一張圖中所示的位置。使用直接選擇工具(A),選擇新創建的矩形的左下錨點,並將其向右移動16 px。選擇右下角的錨點並將其向左移動16 px。
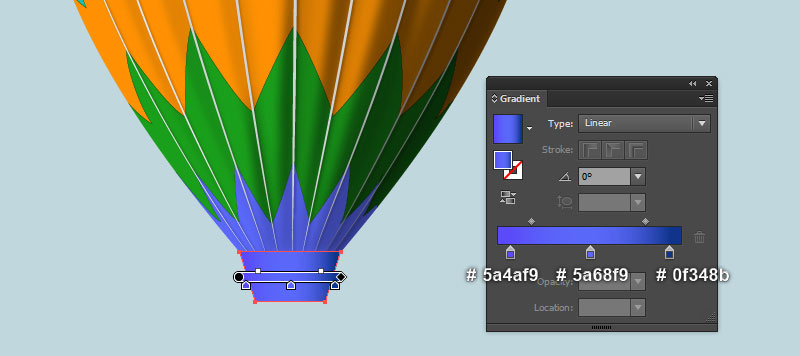
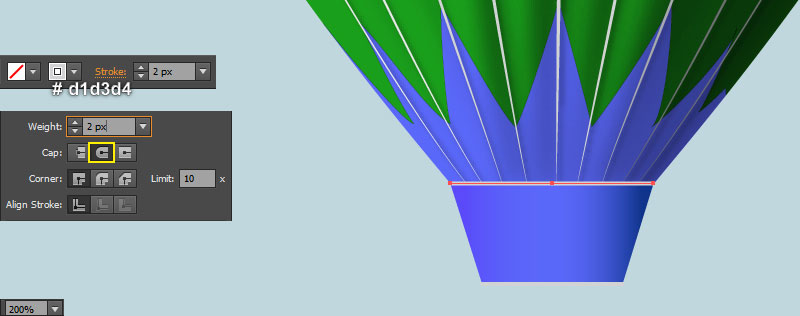
After you are done adjusting the shape of the red rectangle, remove its stroke and then fill this object with the linear gradient as shown in the third image. Next focus on the last image, using the Line Segment Tool (\) create a horizontal line, with a 2px grayish blue stroke (#d1d3d4) and no fill. Keep the newly created line selected, open the Stroke panel (Window > Stroke) and click on the Round Cap icon.
調整完紅色矩形的形狀後,刪除它的描邊,然後用線性漸變填充這個對象,如第三張圖所示。
接下來聚焦在最後一張圖像上,使用線段工具(\)創建一條水平線,帶有2px灰藍色筆觸(#d1d3d4),沒有填充。保持新創建的線條處於選中狀態,打開「畫筆」面板,並單擊端點之「圓端點」圖標。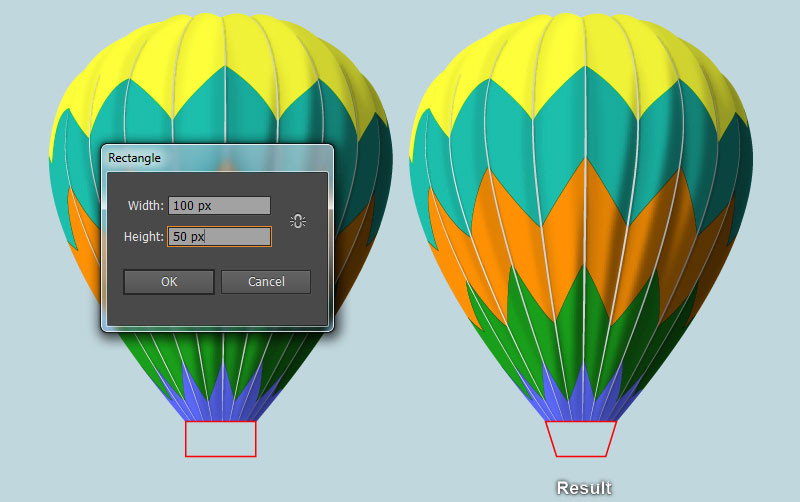
步驟19 製作掛飾及陰影
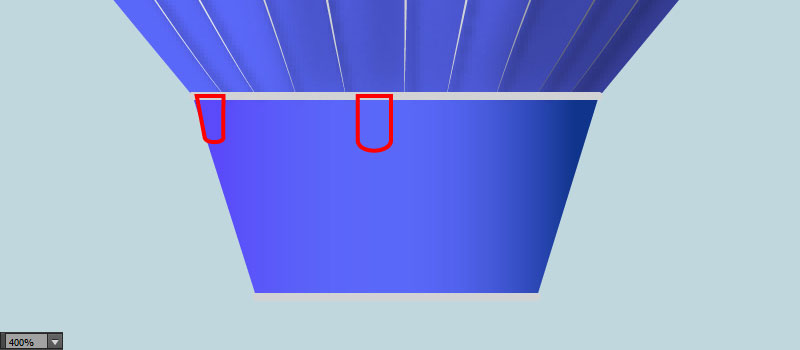
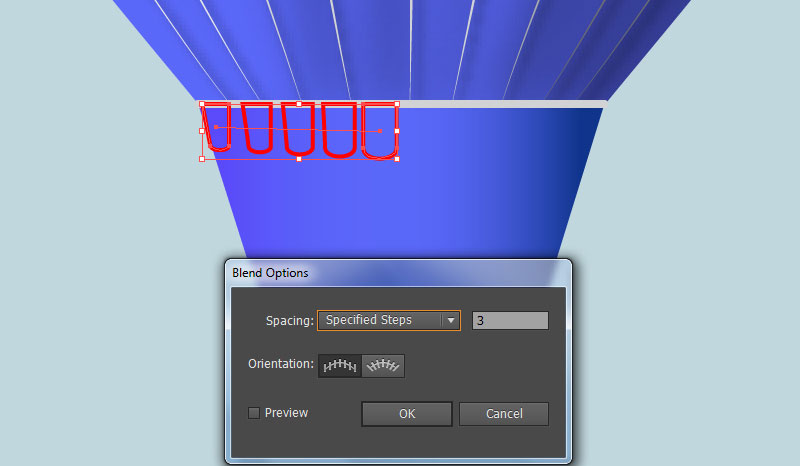
Pick the Pen Tool (P) and create two red objects like you see in the first image. Once your objects are drawn, reselect them and go to the Object > Blend > Blend Options… Follow the data as shown in the second image and click OK, then go to the Object > Blend > Make (Ctrl +Alt +B). Still having the blended object selected and go to the Object > Blend > Expand.
選擇鋼筆工具(P),創建兩個紅色物體,就像你在第一張圖片中看到的那樣。
繪製完物件後,重新選擇它們並按「物件→漸變→漸變選項」,按照第二幅圖中所示的數據,單擊「確定」,然後轉到「物件→漸變→製作」。仍然選擇混合對象,然後轉到「物件→漸變→展開」。
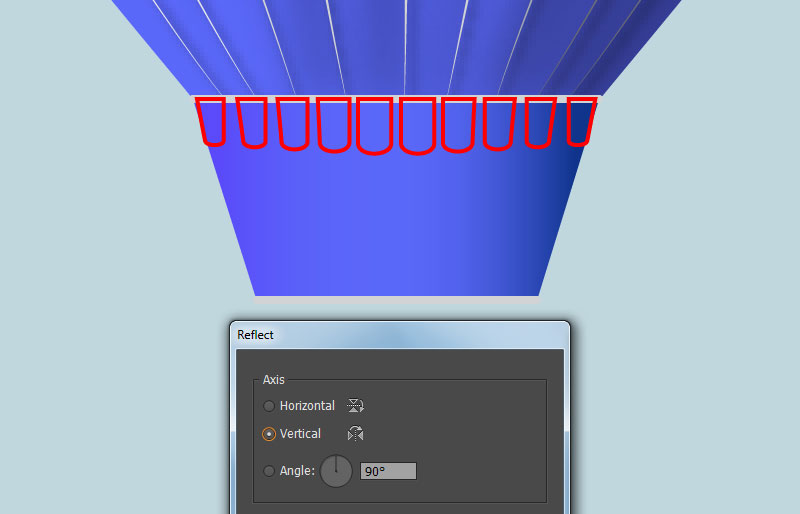
Keep the resulting group selected and go to the Object > Transform > Reflect… Check the Vertical and then click Copy. Drag the copy we have just created to the right and place it as shown in the third image. Don’t forget to hold the Shift key on the keyboard for straight dragging.
保持結果組處於選中狀態,然後轉到「物件→變形→鏡射」...選擇垂直,然後單擊複製。
將我們剛剛創建的複本拖到右邊,並將其放置在第三張圖中。不要忘記按住鍵盤上的Shift鍵進行直線拖動。
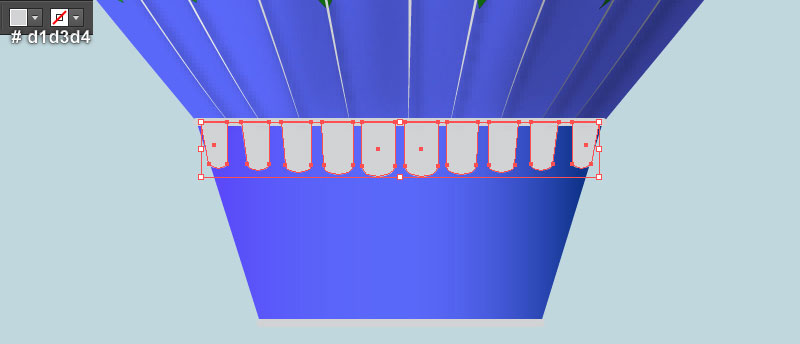
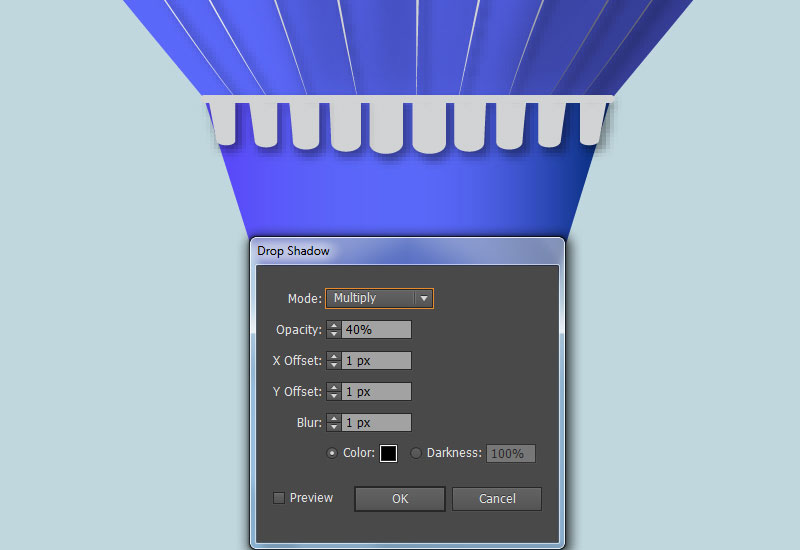
Now select two groups created in this step, remove their strokes and then fill these groups with grayish blue (# d1d3d4). Make sure that the resulting groups are still selected and go to the Effect > Stylize > Drop Shadow… Follow the data like you see in the last image and click OK.
現在選擇在此步驟中創建的兩個組,刪除它們的筆劃,然後用灰藍色(# d1d3d4)填充這些組。確保仍然選擇結果組,然後轉到效果>風格式化>製作陰影.按照上一個圖像中顯示的數據(模式:色彩增值),然後單擊確定。
步驟20
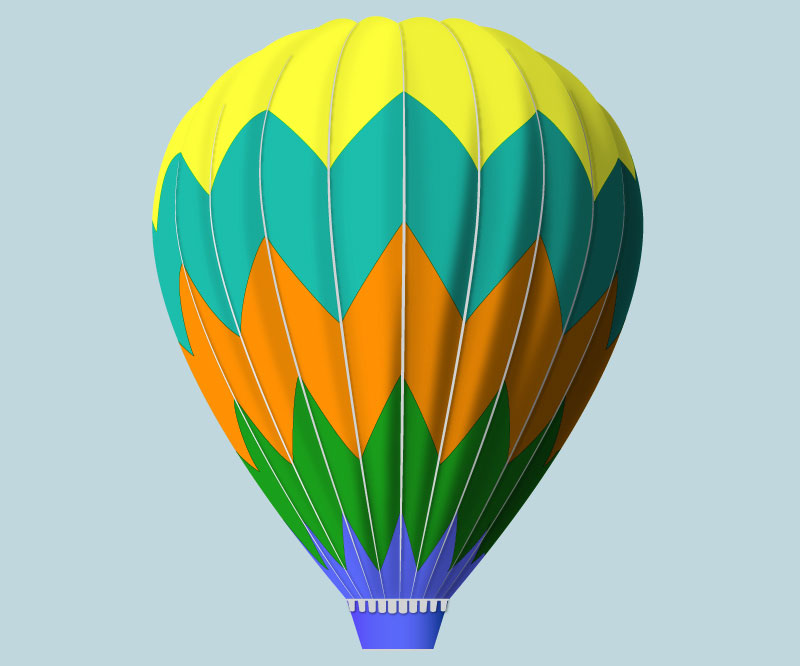
At this point your hot air balloon should look like in the next image:
此時,您的熱氣球應該看起來像下一個圖像:
步驟21 柳條籃子
We will continue with the wicker basket.
我們將繼續用柳條籃子。
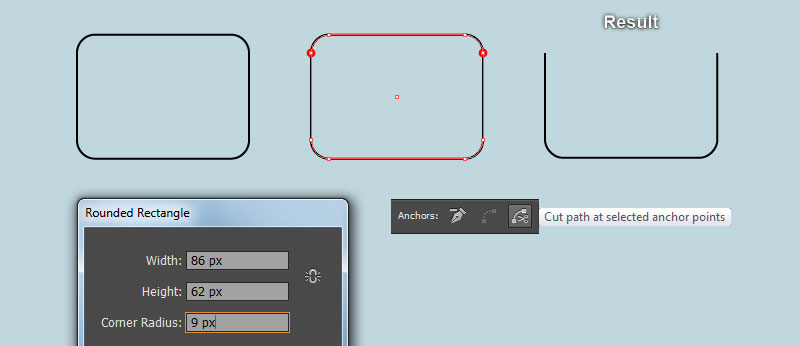
Pick the Rounded Rectangle Tool and create a black rounded rectangle as shown in the first image. With the help of the Direct Selection Tool (A) and the Shift, select two anchor points highlighted with red. Then click on the “Cut path at selected anchor points” icon from the Properties bar. This make the black rounded rectangle becomes two paths. Select and remove the upper path.
選擇圓角矩形工具,創建一個黑色圓角矩形,如第一張圖所示。在直接選擇工具(A)和Shift的幫助下,選擇兩個用紅色突出顯示的錨點。然後從工具控制面板點擊「從選起的錨點處剪下路徑」圖標。這使黑色圓角矩形變成兩條路徑。選擇並刪除上面的路徑。
Step 22步驟22
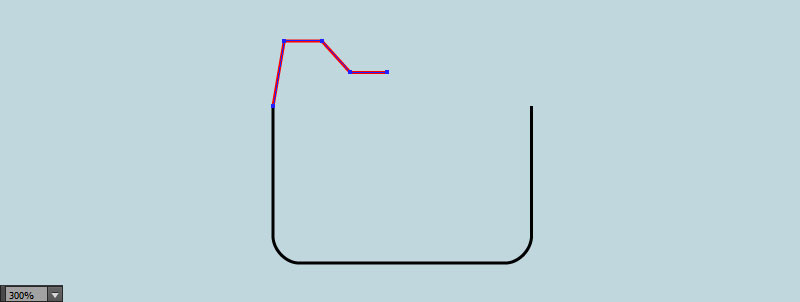
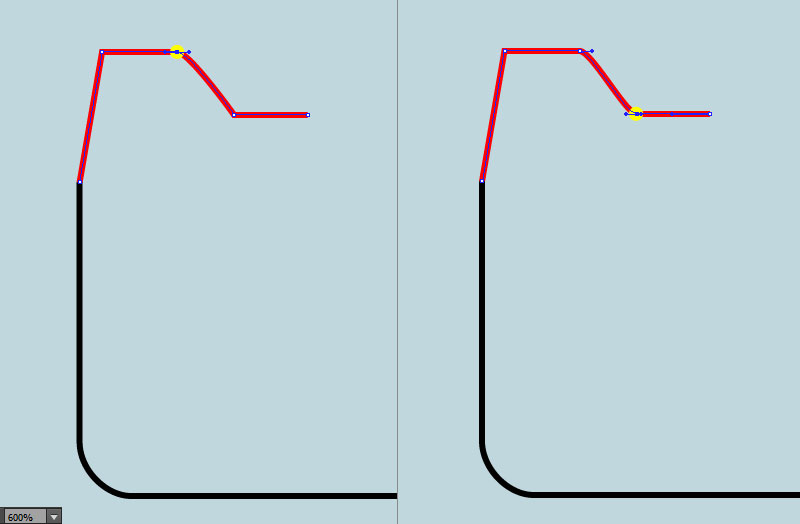
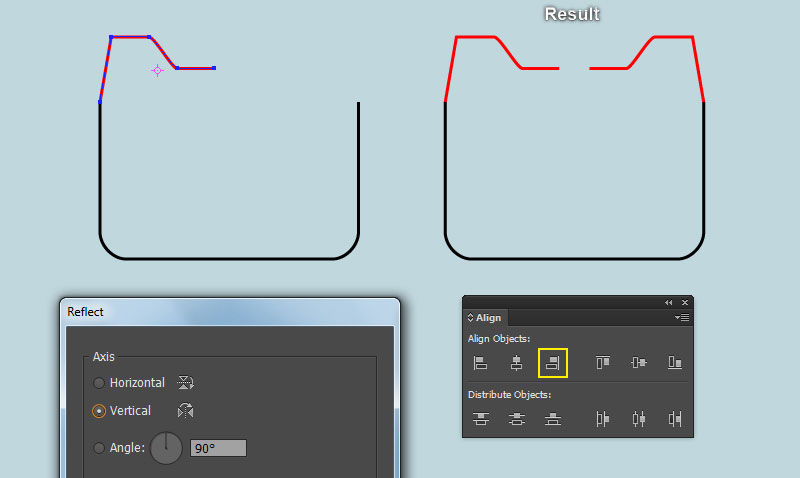
With the Pen Tool (P), create a red path like you see in the first image. Focus on the second image, pick the Convert Anchor Point Tool (Shift +C), click on the anchor point highlighted with yellow, then hold the mouse and drag it to the right while holding Shift. Next focus on the third image, click on the anchor point highlighted with yellow, then hold the mouse and drag it to the right.
使用鋼筆工具(P),創建一個紅色的路徑,就像你在第一張圖片中看到的那樣。聚焦在第二個圖像上,選擇轉換錨點工具(Shift +C),單擊用黃色突出顯示的錨點,然後按住滑鼠並將其向右拖動,同時按住Shift。下一個焦點在第三個圖像上,點擊用黃色突出顯示的錨點,然後按住滑鼠並將其拖到右邊。
Don’t forget to hold the Shift key on the keyboard for straight dragging. Now reselect the red path created in this step and go to the Object > Transform > Reflect… Check the Vertical and click Copy. Keep the newly created path selected, hold down the Shift and click on the black path created in step 21. Release the Shift and click on the black path again (to fixed its position).
不要忘記按住鍵盤上的Shift鍵進行直線拖動。現在重新選擇在此步驟中創建的紅色路徑,並轉到對象>變換>反射...檢查垂直並單擊複製。保持新創建的路徑處於選中狀態,按住Shift鍵並單擊在步驟21中創建的黑色路徑。釋放Shift鍵並再次單擊黑色路徑(以固定其位置)。
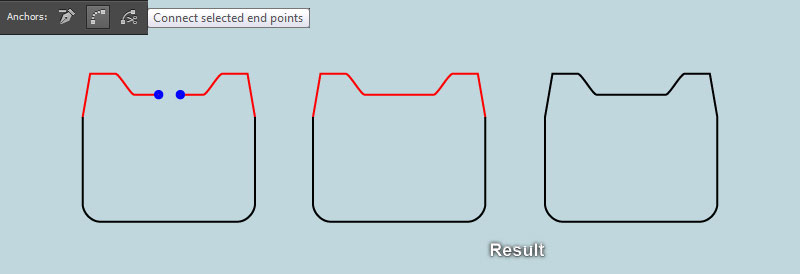
Open the Align panel (Window > Align) and click on the Horizontal Align Right button. Now focus on the sixth image, select the two anchor points highlighted with blue and click on the “Connect selected end points” icon from the Properties bar. Keep the resulting red path selected, hold down the Shift and click on the black path created in step 21. Then press (Ctrl +J) twice to join these two paths together.
打開「對齊」面板(窗口>對齊),然後單擊「水平右對齊」按鈕。現在聚焦在第六張圖像上,選擇兩個用藍色突出顯示的錨點,然後單擊屬性欄中的「連接所選端點「圖標。保持紅色路徑處於選中狀態,按住Shift鍵並單擊在步驟21中創建的黑色路徑。然後按(Ctrl +J)兩次以將這兩個路徑連接在一起。
步驟23 吊籃上色
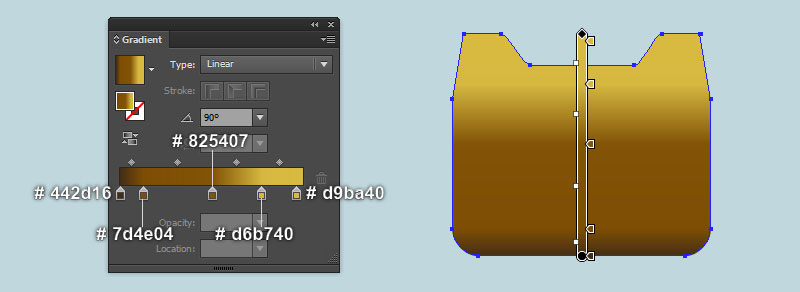
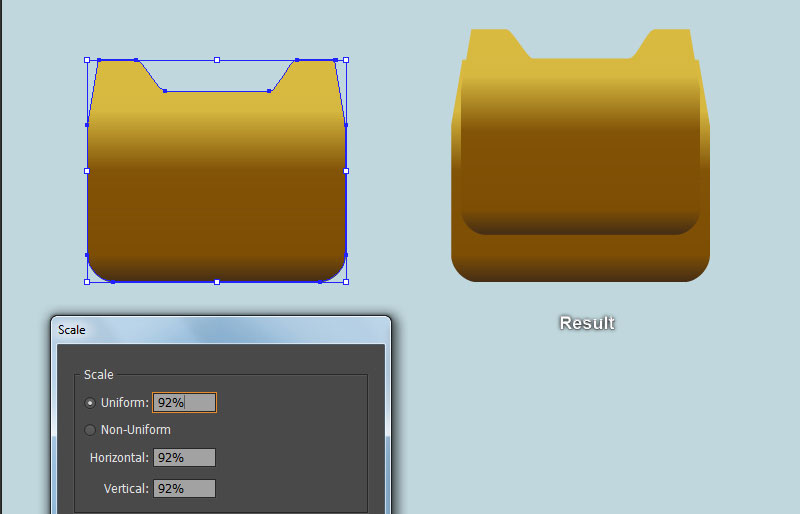
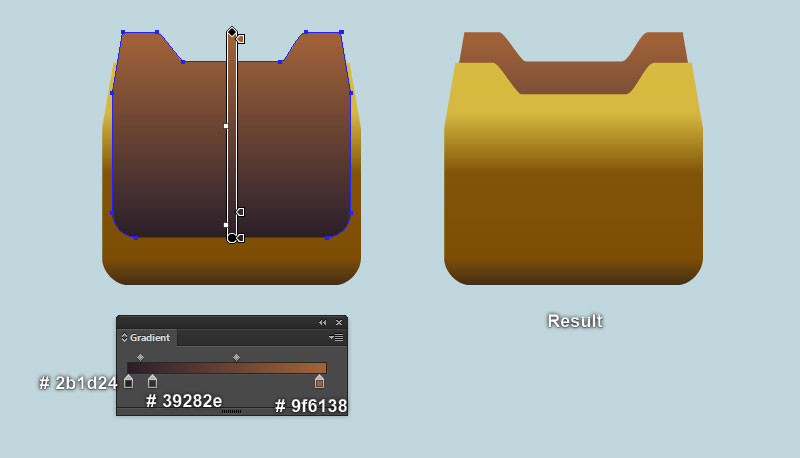
Select the black object created in step 22, remove its stroke and then fill this object with the linear gradient as shown in the first image. Keep the resulting shape selected and go to the Object > Transform > Scale… Check the Uniform and enter a 92% in the Scale box, then click Copy. Move the copy 13px up and then replace the existing fill color with a new linear gradient as shown in the fourth image.
選擇在第22步中創建的黑色對象,刪除其筆劃,然後使用第一幅圖像中所示的線性漸變填充此對象。保持所產生的形狀處於選中狀態,然後轉到「物件>變形>縮放」...選中統一並在縮放框中輸入92%,然後單擊複製。將複本向上移動13px,然後用新的線性漸變替換現有的填充顏色,如第四張圖所示。
Finally, hide the resulting shape behind the first shape created in this step.
最後,將生成的形狀隱藏在此步驟中創建的第一個形狀後面。
步驟24
Select the first shape created in step 23 and make a copy (Ctrl +C, Ctrl +F) of it. Keep the copy selected, swap the fill and stroke colors by clicking the bent double-headed arrow next to the Fill and Stroke color swatches in the Toolbox. Next, replace the existing stroke color of the resulting object with red.
選擇在步驟23中創建的第一個形狀並複製(Ctrl +C,Ctrl +F)。保持複本處於選中狀態,通過單擊窗口中填充和描邊顏色樣本旁邊的彎曲雙頭箭頭來交換填充和描邊顏色。接下來,將結果對象的現有描邊顏色替換為紅色。
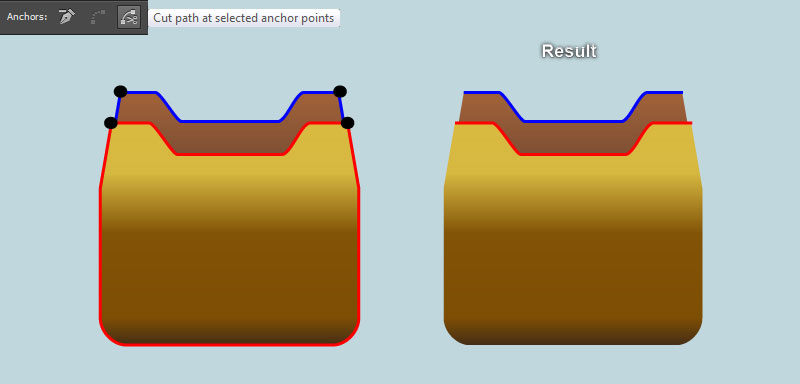
Continue to select the smaller shape created in the step 23 and make a copy of it. Remove the fill color of this copy and add a blue stroke for this object. Focus on the third image, select four anchor points highlighted with black and click on the “Cut path at selected anchor points” icon from the Properties bar. This makes the two objects created in this step become four paths.
繼續選擇在步驟23中創建的較小形狀並複製它。刪除此複本的填充顏色並為此對象添加藍色筆觸。聚焦於第三幅圖像,選擇四個用黑色突出顯示的錨點,然後單擊控制面板中的「在選取的錨點處剪下路徑圖標。這使得在此步驟中創建的兩個對象變為四個路徑。
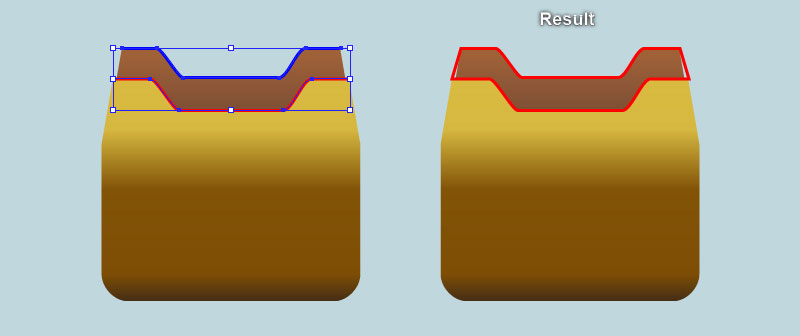
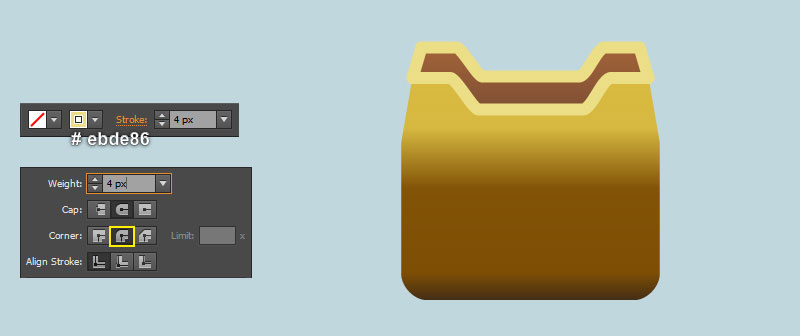
Select and remove the two longer paths. Next reselect the two remaining paths and press (Ctrl +J) twice to connect them. Still having the newly created object selected, change the stroke weight to 4px and replace the existing stroke color with very soft yellow (# ebde86). Keep the resulting object selected, open the Stroke panel (Window > Stroke) and click on the Round Join icon.
選擇並刪除兩條較長的路徑。
接下來,重新選擇剩下的兩個路徑,並按下(Ctrl +J)兩次以連接它們。仍然選擇新創建的物件,將筆劃粗細更改為4px,並將現有筆劃顏色替換為非常柔和的黃色(# ebde86)。保持生成的物件處於選中狀態,打開「筆畫」面板,然後單擊尖角之「圓角」圖標。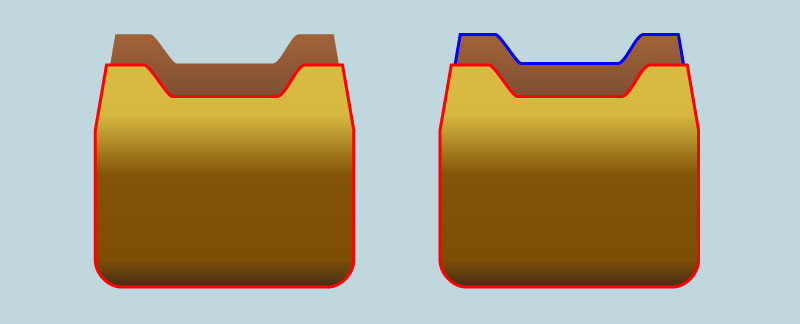
Step 25步驟25
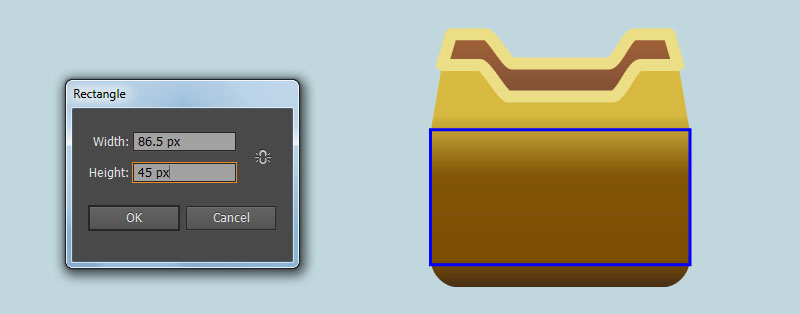
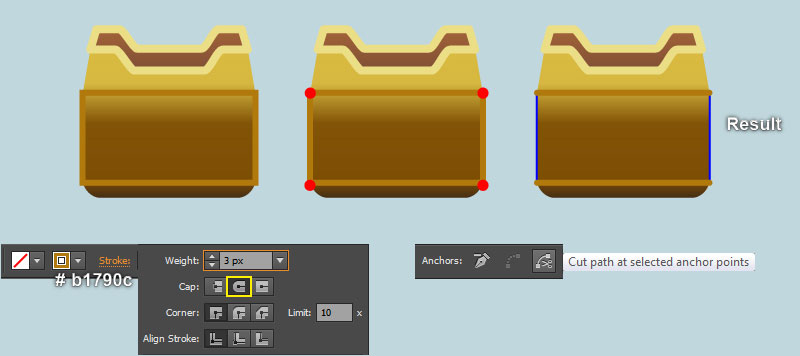
Pick the Rectangle Tool (M) and create a 86.5 by 45px blue rectangle, then place it in the correct position as shown in the first image. Select the newly created rectangle and make a copy (Ctrl +C, Ctrl +F) of it. Change the stroke weight of this copy to 3px and then replace the existing stroke color with dark orange (#b1790c).
選擇矩形工具(M),創建一個86.5x45px的藍色矩形,然後將其放置在正確的位置,如第一張圖所示。選擇新創建的矩形並複製(Ctrl +C,Ctrl +F)。將此複本的描邊粗細更改為3px,然後將現有描邊顏色替換為深橙子(#b1790 c)。
Keep the resulting rectangle selected, open the Stroke panel (Window > Stroke) and click on the Round Cap icon. Now with the help of the Direct Selection Tool (A) and the Shift, select four anchor points highlighted with red. Then click on the “Cut path at selected anchor points” icon from the Properties bar. This makes the dark orange rectangle become four paths. Select and remove the two vertical paths.
保持選中的矩形,打開筆畫面板,然後單擊圓角圖標。現在,在直接選擇工具(A)和Shift的幫助下,選擇四個用紅色突出顯示的錨點。然後點擊「再選選的錨點處剪下路徑圖標。這會使暗橙子矩形變為四條路徑。選擇並刪除兩條垂直路徑。
步驟26 編織吊籃紋理
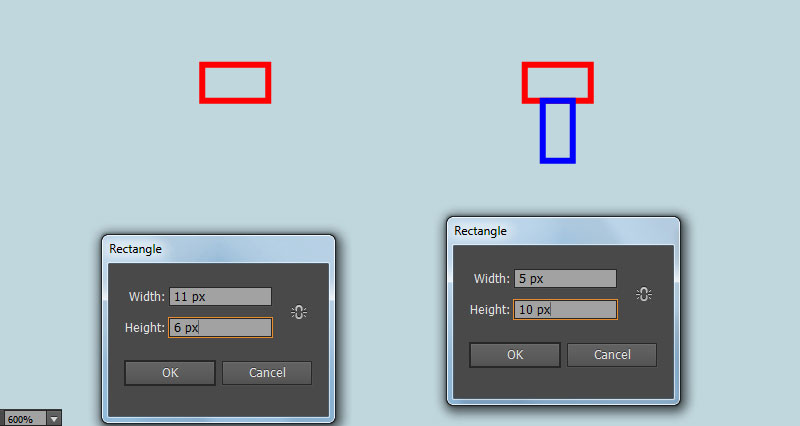
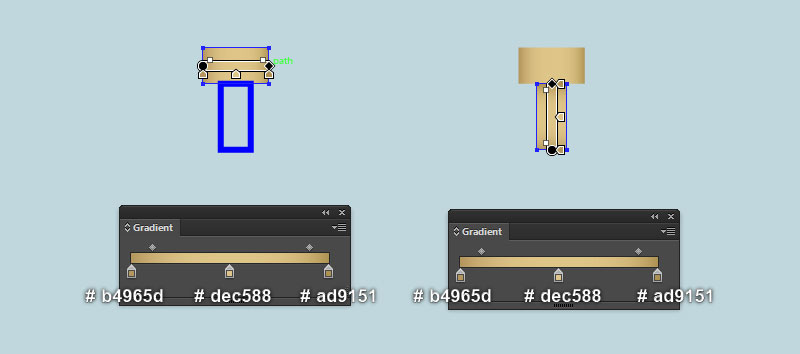
Pick the Rectangle Tool (M) and create two rectangles with dimensions: 11 by 6px and 5 by 10px. Then place these two new rectangles to the positions as shown in the second image. Reselect the two newly created rectangles, remove their strokes and then fill them with the linear gradients like you see in the third and the fourth images.
選擇矩形工具(M),創建兩個尺寸為11 x 6px和5 x 10px的矩形。然後將這兩個新的矩形放置到第二張圖中所示的位置。重新選擇兩個新創建的矩形,刪除它們的筆畫,然後用線性漸變填充它們,就像你在第三和第四張圖中看到的那樣。
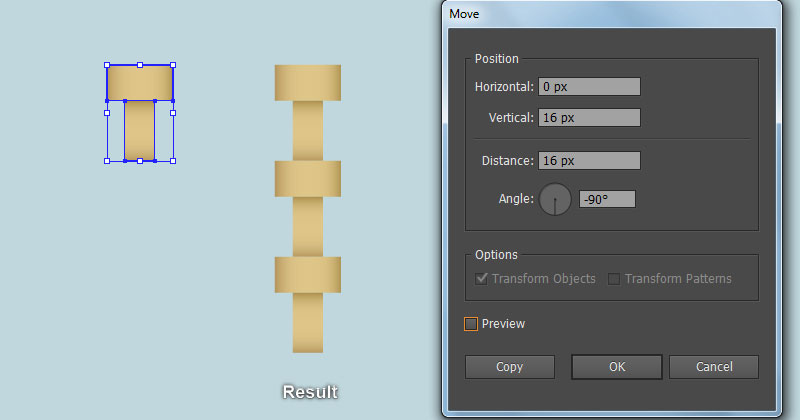
Select the two rectangles you just filled with soft orange gradient colors and go to the Object > Transform > Move… Enter a 16px in the Vertical box and click Copy. Then press (Ctrl +D) once to get the results like you see in the fifth image.
選擇兩個你剛剛用柔和的橙子漸變色填充的矩形,然後轉到「物件←變形→移動」.在垂直框中輸入16像素,然後單擊複製。然後按下「物件←變形→〉再次變形」(Ctrl +D)一次以獲得如第五張圖所示的結果。
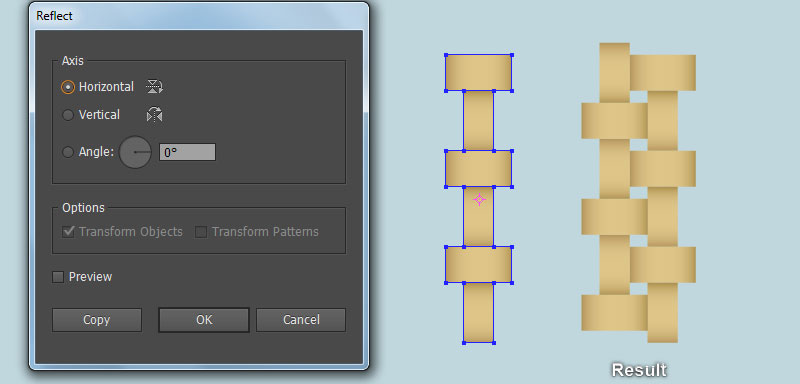
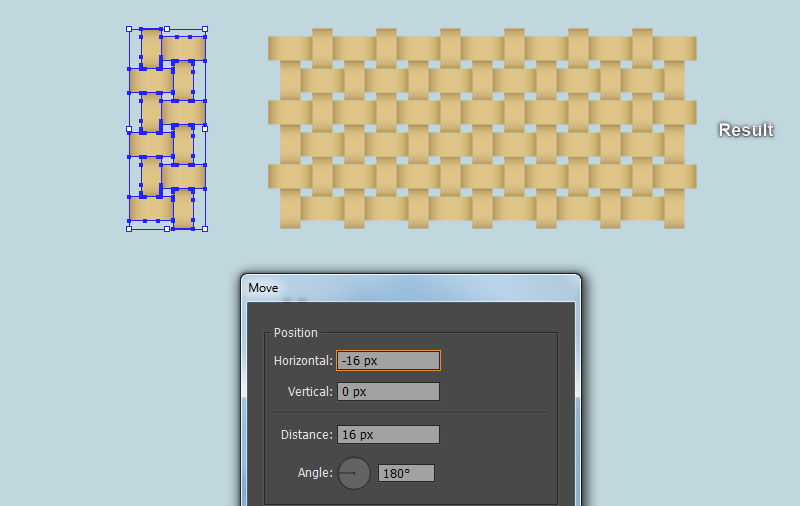
Select all rectangles created in this step and go to the Object > Transform > Reflect… Check the Horizontal and click Copy, then move the copies 8px to the left and 2px up. Continue select all rectangles created in this step and open the Move dialog box again. Enter a -16px in the Horizontal box and click Copy. Then press (Ctrl +D) five times to get the results like you see in the last image.
選擇在這一步中創建的所有矩形,然後轉到「物件←變形→鏡射」.檢查水平並單擊複製,然後將複本向左移動8 px,向上移動2 px。繼續選擇在此步驟中創建的所有矩形,然後再次打開「移動」對話框。在水平框中輸入-16px,然後單擊複製。然後按下(Ctrl +D)五次,以獲得與上一張圖像中所見相同的結果。
Finally select and group (Ctrl +G) all rectangles created in this step.
最後,選擇並組成群組(Ctrl +G)在此步驟中創建的所有矩形。
步驟27 剪裁編織物
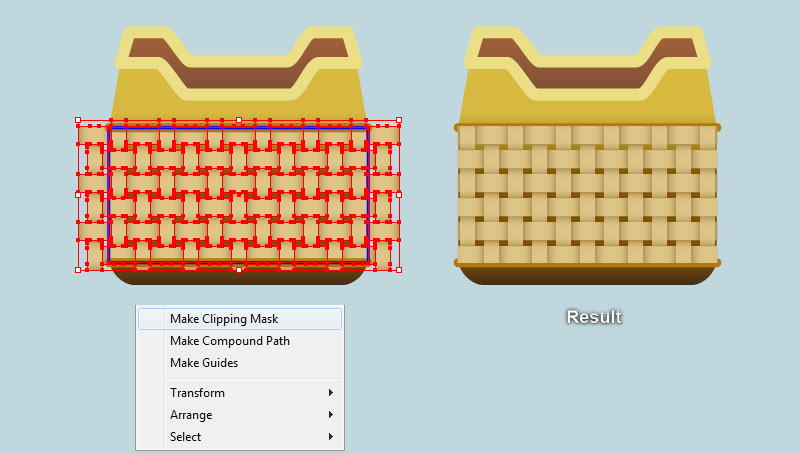
Place the group created in the step 26 to the position as shown in the first image. Before you continue, select the blue rectangle created in step 25 and bring it to the front (Ctrl +Shift +Right Square Bracket). Keep this rectangle selected, hold down the Shift and click on the group created in the step 26.
將步驟26中創建的組放置到第一幅圖所示的位置。在繼續之前,選擇在步驟25中創建的藍色矩形並將其置於前面(Ctrl +Shift +Right Square)。保持選中此矩形,按住Shift鍵並單擊在步驟26中創建的組。
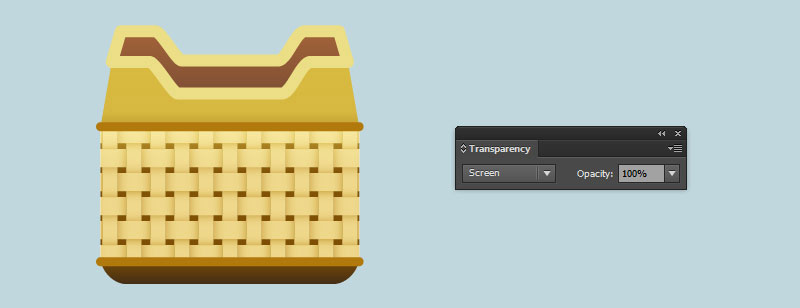
Right-click on the artboard and then select the Make Clipping Mask section from the drop-down menu. Make sure that the clipping set is still selected, change the Blending Mode to Screen. Finally, hide this clipping set behind the two horizontal paths created in the step 25.
在畫板上單擊滑鼠右鍵,然後從下拉菜單中選擇「製作剪裁遮色片」部分。確保剪輯設置仍然處於選中狀態,將不透明度之混合模式更改為網屏。最後,將此裁剪集隱藏在步驟25中創建的兩個水平路徑後面。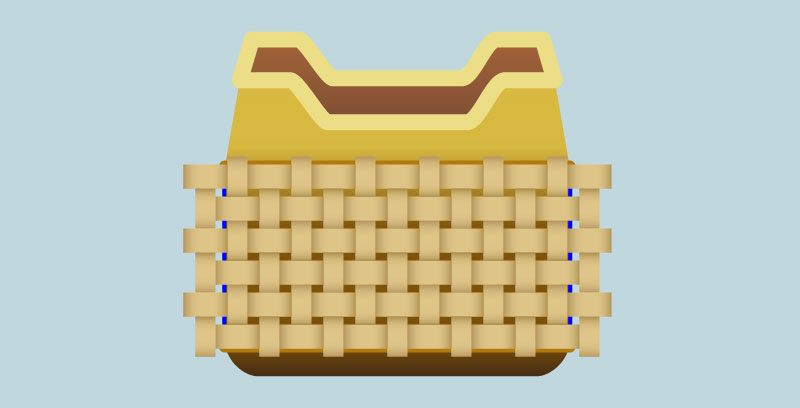
Step 28步驟28
Select and group (Ctrl +G) all objects created from beginning step 21 to this time. Next place the newly created group to the position like you see in the image below.
選擇並分組(Ctrl +G)從第21步開始到此時創建的所有對象。接下來,將新創建的組放置到如下圖所示的位置。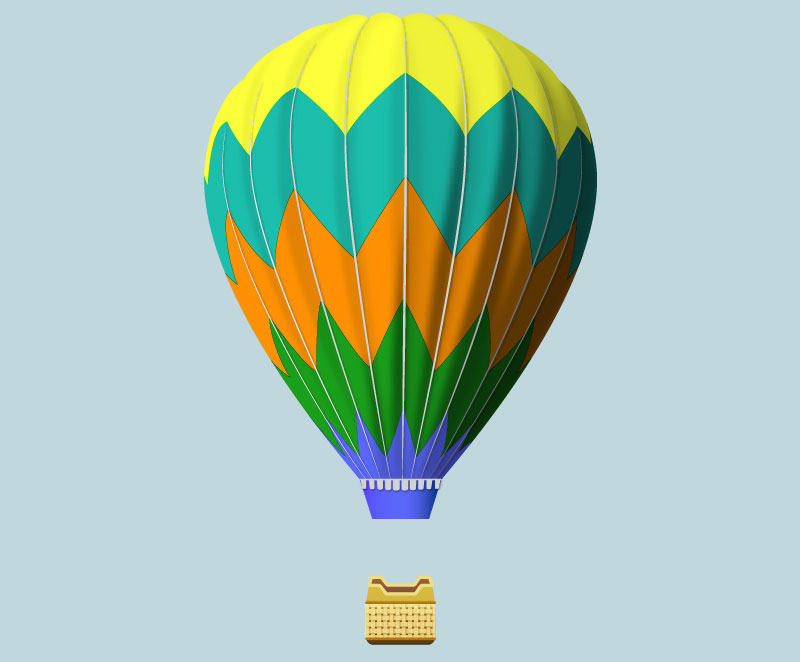
Step 29步驟29
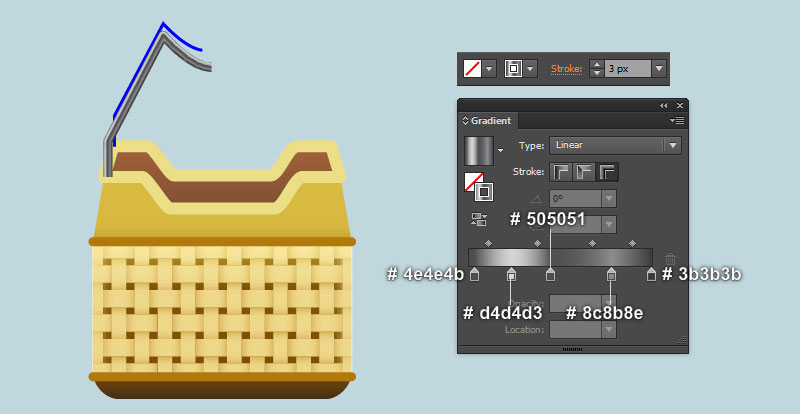
Pick the Pen Tool (P) and create two paths like you see in the first and the second images. Reselect the red path, change the stroke weight to 3px and replace the existing stroke color with the linear gradient across stroke as shown in the third image.
選擇鋼筆工具(P)並創建兩條路徑,就像你在第一和第二張圖片中看到的那樣。重新選擇紅色路徑,將筆畫粗細改為3px,並將現有的筆畫顏色替換為第三幅圖中所示的線性漸變。
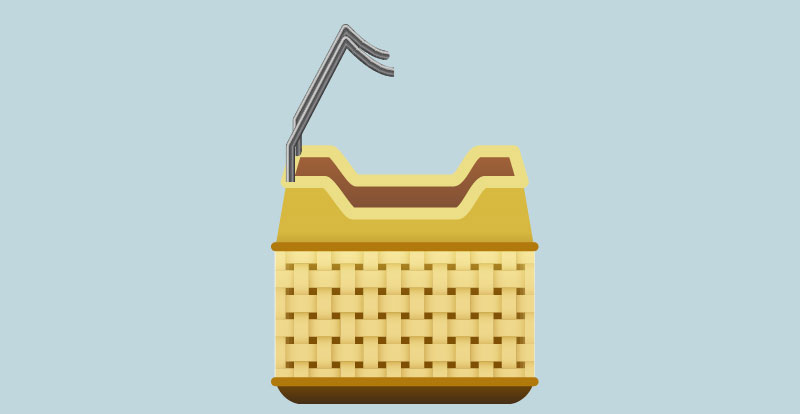
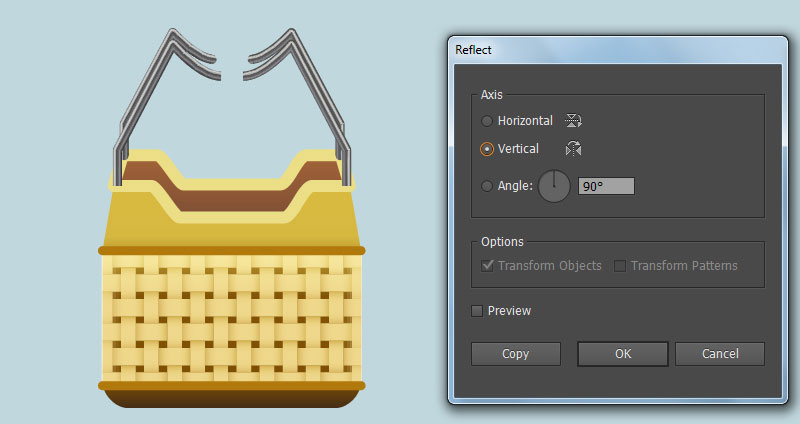
Next, select the blue path created in this step, pick the Eyedropper Tool (I) and click on the path you just filled with dark grayish blue gradient colors. Now select the two paths created in this step and go to the Object > Transform > Reflect… Check the Vertical and click Copy.
接下來,選擇在這一步中創建的藍色路徑,選擇吸管工具(I),然後單擊剛剛填充了深灰藍色漸變顏色的路徑。現在選擇在此步驟中創建的兩個路徑,並轉到對象>變換>反射...檢查垂直並單擊複製。
Then drag the copy to the right and place it as shown in the last image. Don’t forget to hold the Shift key on the keyboard for straight dragging.
然後向右拖動複本並將其放置在最後一個圖像中。不要忘記按住鍵盤上的Shift鍵進行直線拖動。
Step 30步驟30
Pick the Rectangle Tool (M) and create a red rectangle, then place it to the position as shown in the first image. Keep the newly created rectangle selected, pick the Eyedropper Tool (I) and click on any path created in step 29.
選擇矩形工具(M)創建一個紅色矩形,然後將其放置在第一張圖中所示的位置。保持選中新創建的矩形,選擇吸管工具(I),然後單擊在步驟29中創建的任何路徑。
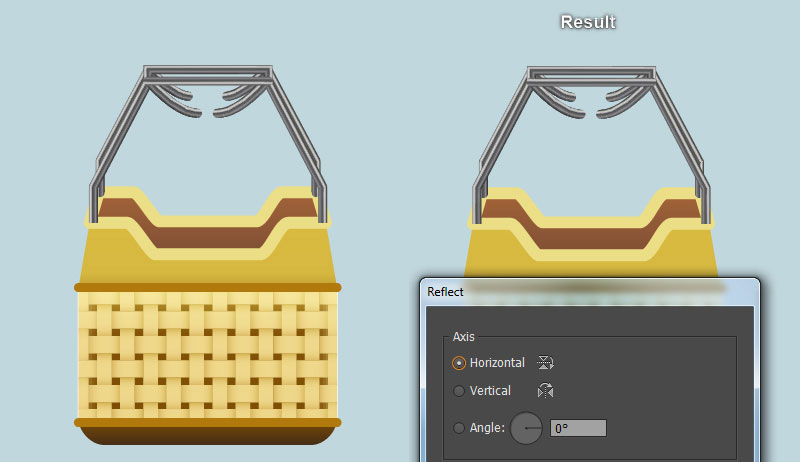
With the help of the Direct Selection Tool (A) and the Shift, select the two bottom anchor points of the resulting rectangle. Then click on the “Cut path at selected anchor points” icon from the Properties bar. This makes the rectangle becomes two paths. Now select the lower path and go to the Object > Transform > Reflect… Check the Horizontal and click OK.
在直接選擇工具(A)和Shift的幫助下,選擇結果矩形的兩個底部錨點。然後點擊「剪切路徑在選定的錨點「圖標從屬性欄。這使得矩形變成兩條路徑。現在選擇下面的路徑並轉到對象>變換>反射...檢查水平並單擊確定。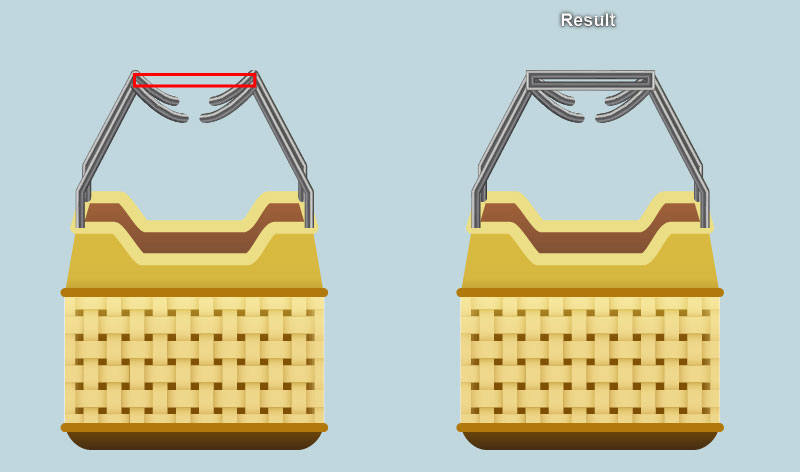
Step 31步驟31
Using the Line Segment Tool (\) create four lines as shown in the first and the second images. Once your lines are drawn, reselect them, then pick the Eyedropper Tool (I) and click on any path created in step 29.
使用線段工具(\)創建四條線,如第一個和第二個圖像所示。一旦你的線被繪製,重新選擇它們,然後選擇吸管工具(I),並點擊在步驟29中創建的任何路徑。
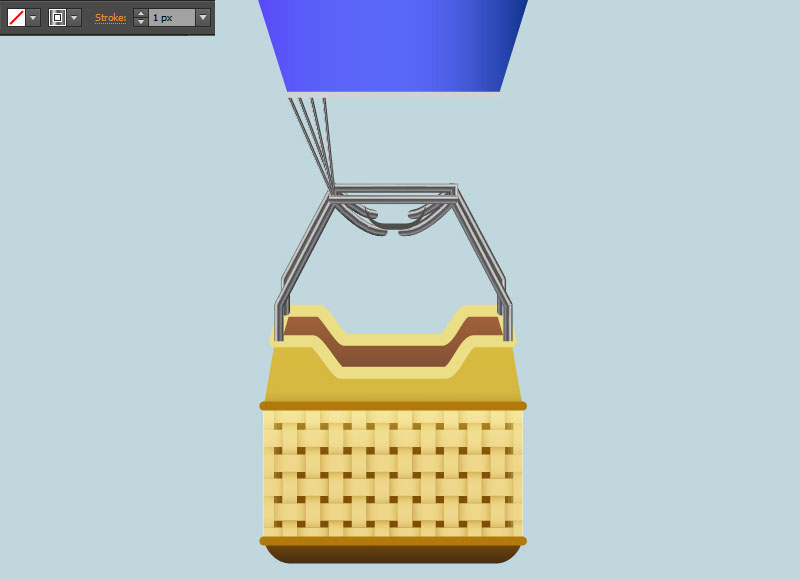
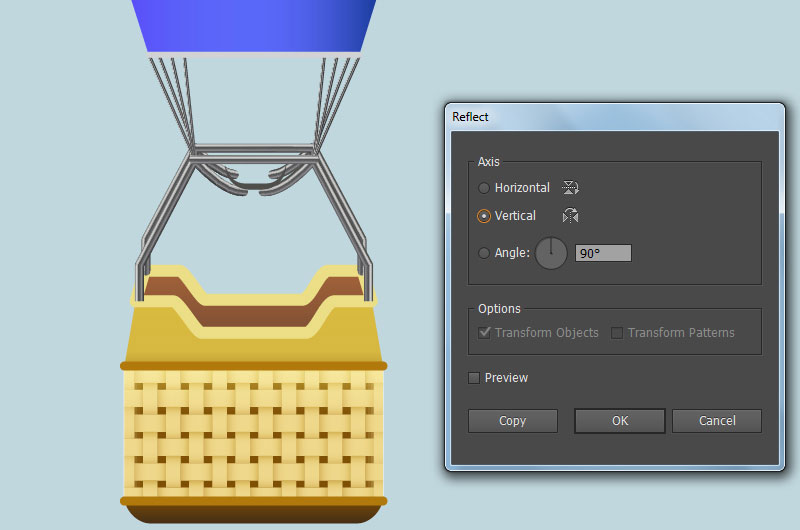
Keep these resulting lines selected and then change the stroke weight to 1px. Make sure that the resulting lines are still selected and go to the Object > Transform > Reflect… Check the Vertical and click Copy. Drag the copies we have just created to the right and place them as shown in the last image. Don’t forget to hold the Shift key on the keyboard for straight dragging.
保持這些生成的線條處於選中狀態,然後將描邊粗細更改為1px。確保仍然選擇生成的線條,然後轉到對象>變換>反射...檢查垂直,然後單擊複製。將我們剛剛創建的複本拖到右側,並將其放置在最後一個圖像中。不要忘記按住鍵盤上的Shift鍵進行直線拖動。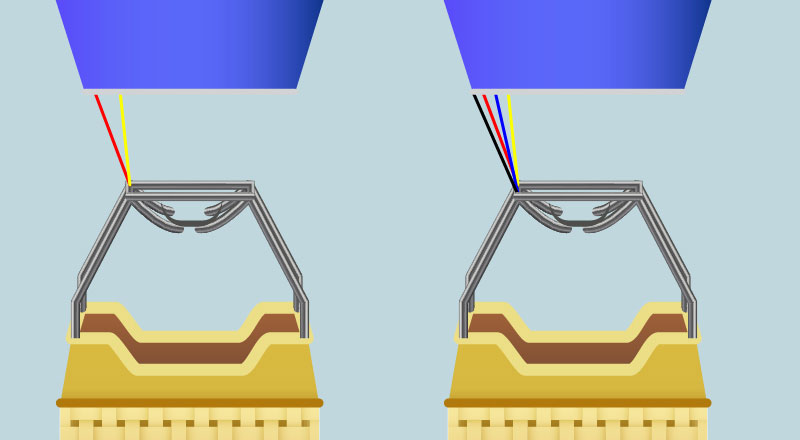
Step 32步驟32
It’s time to draw the burner. Pick the Rounded Rectangle Tool and create a black round rectangle like you see in the first image. Continue to pick the Rectangle Tool (M) and create a 5 by 4px red rectangle, then place it in the correct position as shown in the second image.
是時候拔出一次性手機了選擇圓角矩形工具,創建一個黑色圓角矩形,就像你在第一張圖中看到的那樣。繼續選擇矩形工具(M),創建一個5 × 4px的紅色矩形,然後將其放置在正確的位置,如第二張圖所示。
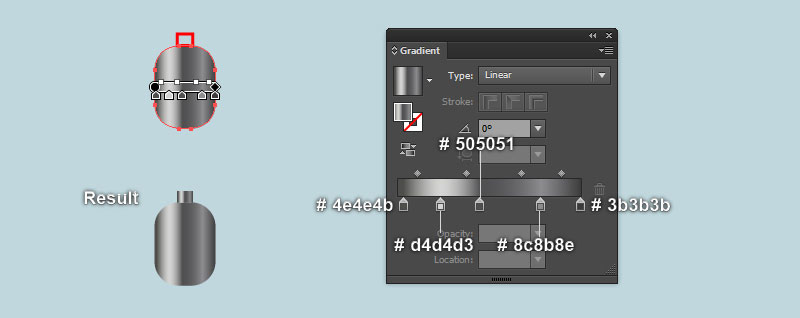
Now reselect the black round rectangle, remove its stroke and then fill this object with the linear gradient as shown in the third image. Next, select the red rectangle created in this step, pick the Eyedropper Tool (I) and click on the round rectangle you just filled with dark grayish blue gradient colors.
現在重新選擇黑色的圓形矩形,刪除它的筆觸,然後用線性漸變填充這個對象,如第三張圖所示。接下來,選擇在這一步中創建的紅色矩形,選擇吸管工具(I),然後單擊剛剛用深灰色藍色漸變色填充的圓形矩形。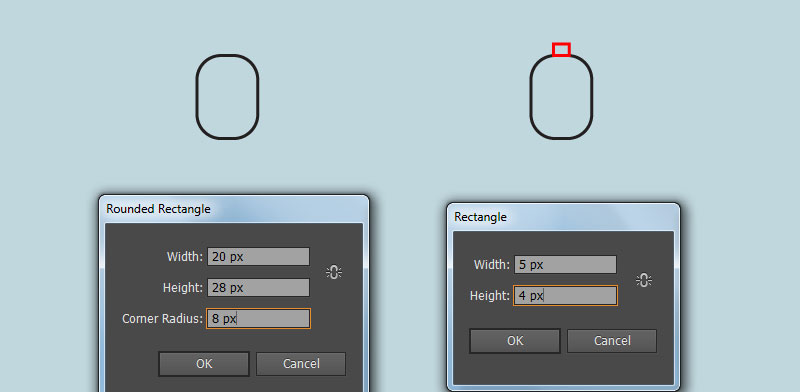
Step 33步驟33
With the help of the Pen Tool (P) and the Gradient Tool (G), create a shape like you see in the first and the second images. Once your shape is drawn, reselect it and then apply a 2px Gaussian Blur effect for this shape. Select and group (Ctrl +G) all objects created from beginning step 32 to this time. The burner is done!
在鋼筆工具(P)和漸變工具(G)的幫助下,創建一個像你在第一張和第二張圖片中看到的形狀。繪製形狀後,重新選擇它,然後為該形狀應用2 px高斯模糊效果。選擇並分組(Ctrl +G)從第32步開始到此時創建的所有對象。一次性手機搞定了!
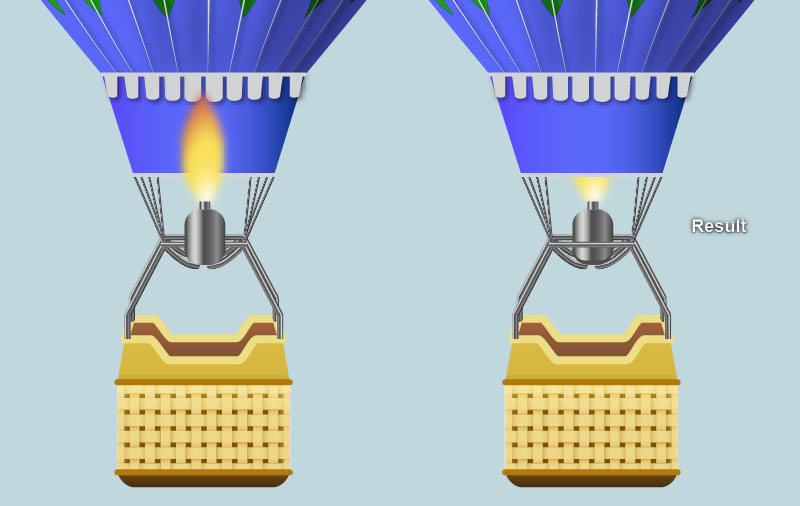
Next, place it to the position as shown in the next to last image and hide this burner behind the skirt of the hot air balloon and the horizontal path created in step 30.
接下來,將其放置在倒數第二個圖像中所示的位置,並將此燃燒器隱藏在熱氣球的裙部和步驟30中創建的水平路徑後面。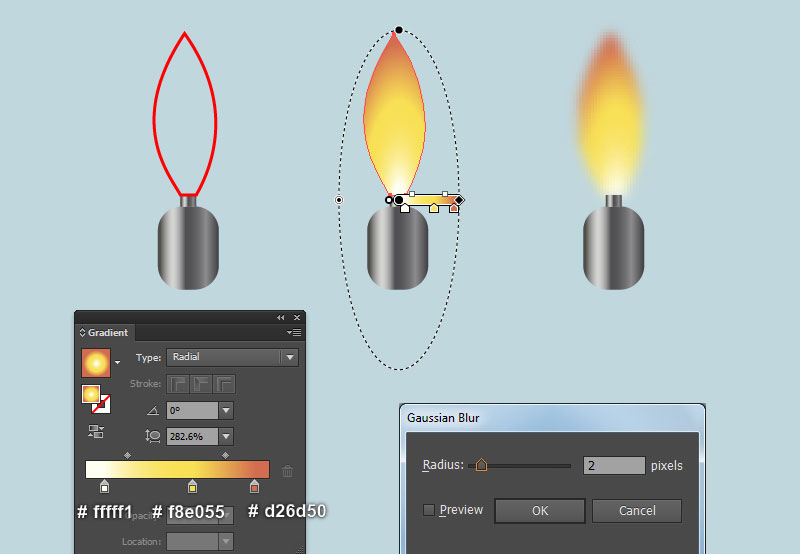
Step 34步驟34
Select and group (Ctrl +G) all objects created from beginning step 2 to this time.
選擇並組合(Ctrl +G)從第2步開始到此時創建的所有對象。
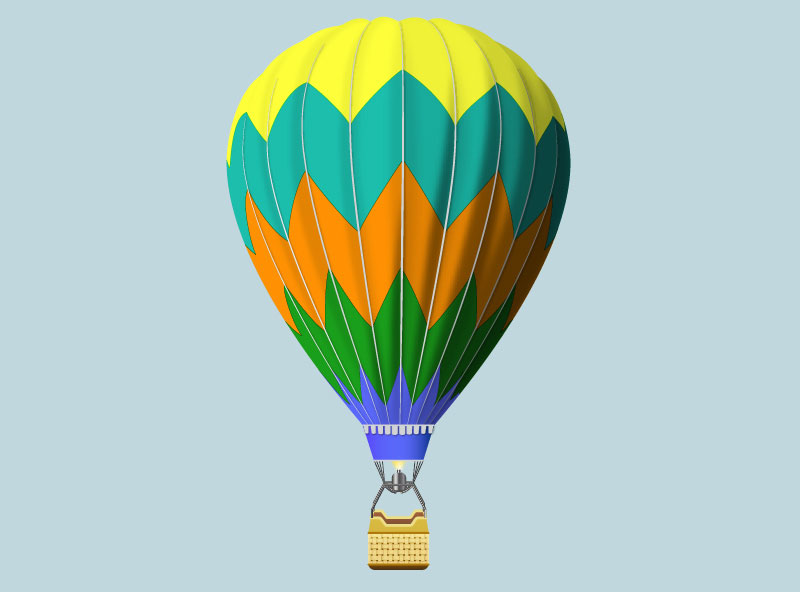
The hot air balloon is ready and looks like this:
熱氣球已經準備好了,看起來像這樣:
Step 35步驟35
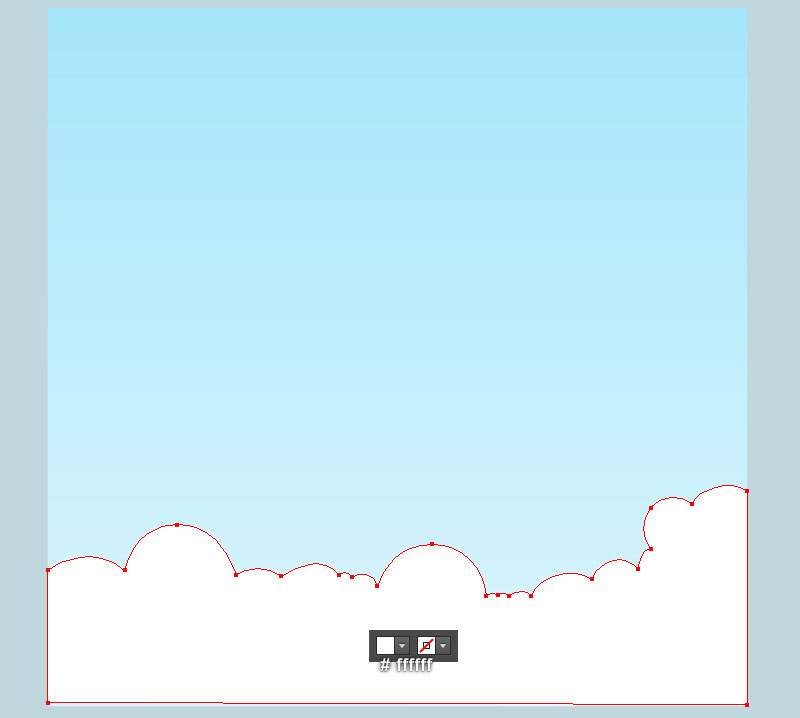
We’re done with the hot air balloon. It’s time for the background now. With the help of the Rectangle Tool (M) and the Gradient Tool (G), create 1000 by 1000px very soft cyan rectangle. Pick the Pen Tool (P) and create a white shape (#ffffff) like you see in the second image. The last thing to do is place the hot air balloon into the newly created background.
熱氣球的事已經解決了現在是背景時間。在矩形工具(M)和漸變工具(G)的幫助下,創建1000 × 1000 px的非常柔和的青色矩形。選擇鋼筆工具(P)並創建一個白色形狀(#ffffff),就像你在第二張圖片中看到的那樣。最後要做的是將熱氣球放入新創建的背景中。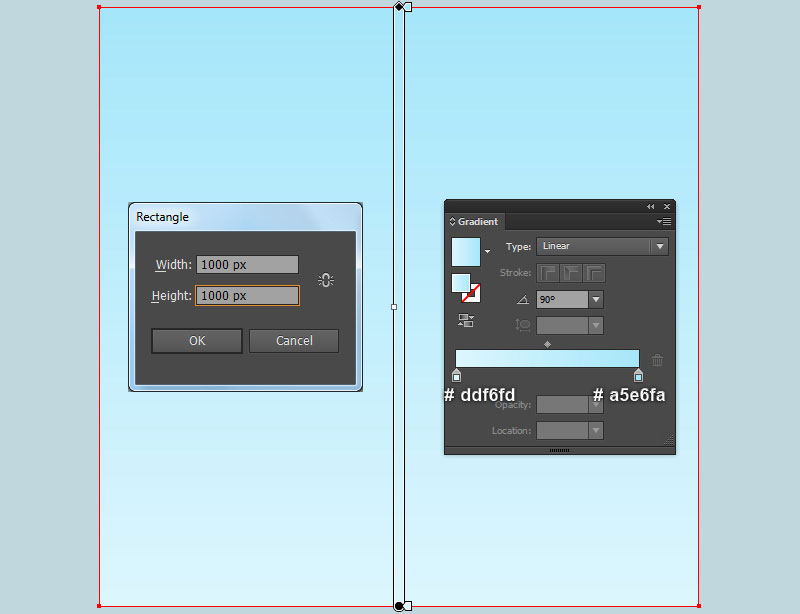
And We’re Done!我們完成了!