


In this tutorial, you will learn how to create and use an Art Brush in Adobe Illustrator to create a vector traditional Russian pottery design called Gzhel!
在本教程中,您將學習如何在Adobe Illustrator中創建和使用藝術畫筆來創建一個名為Gzhel的矢量傳統俄羅斯陶器設計!
Along the way, you will learn how to create a seamless pattern from any elements. Our Gzhel pottery flowers and decorations can be used in any Russian style designs.
沿著而來的是,您將學習如何從任何元素創建無縫圖案。我們的Gzhel陶瓷花和裝飾品可以用於任何俄羅斯風格的設計。
Elegant and decorative, Gzhel was created in the 17th century in the village with the same name. That village had deposits of high-quality clay and was famous for its pottery, tiles, and simple children's toys made from clay. The Gzhel pottery design is traditionally blue, with floral curls, leaves, and flower.
優雅和裝飾,Gzhel是在17世紀在同名的村莊創建的。那個村莊有高質量的粘土礦藏,以陶器、瓷磚和粘土製成的簡單兒童玩具而聞名。Gzhel陶器的設計是傳統的藍色,有花的捲髮,葉子和花。
You can find awesome ready-to-use Gzhel vector ornaments on GraphicRiver. Check them for inspiration.
你可以在
In this tutorial, I'll show you how to create a beautiful floral design in traditional Russian Gzhel style. Let's start!
在本教程中,我將向您展示如何創建一個美麗的花卉設計在傳統的俄羅斯格熱爾風格。我們開始吧!
1. How to Make the First Flower
1. 如何製作第一朵花
Step 1步驟1
Create a New Document (File > New) with these settings:
使用以下設置創建新文檔(文件>新建):
- Number of Artboards: 1
藝術板數量:1 - Width: 1000 px
寬度:1000像素 - Height: 1000 px
高度:1000像素 - Units: Pixels
單位:像素 - Color Mode: RGB
顏色模式:RGB
Step 2步驟2
Show Ruler (Command-R or View > Rulers > Show Rulers) and drag the vertical ruler to your artboard. Our flower will be symmetrical, so we need a center guideline.
顯示標尺(Command-R或View > Rulers > Show Rulers)並將垂直標尺拖到畫板上。我們的花是對稱的,所以我們需要一個中心線。
Step 3步驟3
Make a 200 x 200 px circle; you can set the size in the Transform panel (Window > Transform). To draw a perfect circle, use the Ellipse Tool (L) and hold Shift. Color it to a Gradient (Window > Gradient), type Radial, and use the colors #78C5F8and #030065. To edit an object's gradient, you can select your circle, press G, and drag the sliders.
製作一個200 x 200 px的圓;您可以在「變換」面板(窗口>變換)中設置大小。要畫一個完美的圓,請使用橢圓工具(L)並按住Shift鍵。將其著色為漸變(窗口>漸變),鍵入徑向,並使用顏色#78C5F8和#030065。要編輯對象的漸變,您可以選擇圓,按G鍵,然後拖動滑塊。

Step 4步驟4
Create another ellipse with the Ellipse Tool (L) and color it in #030065. Select your new ellipse, copy (Command-C) and paste to front (Command-F). Hold Alt and make it smaller. Color it with the same gradient as the big circle, but the gradient's type is Linear. To pick the same color or gradient, use the Eye Dropper Tool (I) and click on the object with the desired style.
用橢圓工具(L) 創建另一個橢圓,並將其著色為#030065。選擇新的橢圓,複製(Command-C)並粘貼到前面(Command-F)。按住Alt鍵,使其變小。用與大圓圈相同的漸變色對其著色,但漸變的類型為線性。要選擇相同的顏色或漸變,請使用滴管工具(I)並單擊具有所需樣式的對象。

Step 5步驟5
Create a new ellipse, color it to white (#ffffff), copy (Command-C) and paste in front (Command-F). Hold Alt and make it smaller. Color the new ellipse in #030065.
創建一個新的橢圓,將其著色為白色(#ffffff),複製(Command-C) 並粘貼到前面(Command-F)。按住Alt鍵,使其變小。為#030065中的新橢圓著色。
Select the bottom ellipse with a linear gradient, copy (Command-C) and paste in front (Command-F). Bring to front (Command-Shift-]). Select the top three ellipses and click Crop from the Pathfinder panel (Window > Pathfinder).
選擇底部的橢圓與線性梯度,複製(Command-C) 和粘貼在前面(Command-F)。置於最前面(Command-Shift-])。選擇頂部的三個橢圓,然後從「路徑查找器」面板(窗口>路徑查找器)中單擊「裁剪」。
Object > Path > Clean Up to delete any unwanted objects after using the Crop Tool.
對象>路徑>清理以在使用裁剪工具後刪除任何不需要的對象。

Step 6步驟6
Draw an ellipse and color it with the radial gradient (pick it with the Eye Dropper Tool (I) from the big circle). With the Direct Selection Tool (A), select the bottom anchor point, and convert this point to a corner with the button from the top panel.
畫一個橢圓,用徑向漸變色(用滴管工具(I)從大圓圈中拾取)。使用直接選擇工具(A),選擇底部錨點,並使用頂部面板中的按鈕將此點轉換為角。

Step 7步驟7
Send this leaf to the back (Command-Shift-[) and move it under the main shape. With the Selection Tool (V), you can transform and rotate it.
將此葉子發送到後面(Command-Shift-[)並將其移動到主形狀下。使用選擇工具(V),您可以變換和旋轉它。
Copy the leaf and paste it to the back (Command-B), and then move the new leaf under the first one and rotate it. Repeat with the other leaves.
複製葉子並將其粘貼到後面(Command-B),然後將新葉子移動到第一個葉子下面並旋轉它。對其他葉子重複此操作。

Step 8步驟8
Select all leaves, copy (Command-C) and paste to front (Command-F). From the Transform panel menu (Window > Transform), select Flip Horizontal. Or right-click on your selected objects and select Transform > Reflect.
選擇所有葉子,複製(Command-C) 並粘貼到前面(Command-F)。從「變換」面板菜單(窗口>變換)中,選擇「水平翻轉」。或者右鍵單擊所選對象並選擇變換>反射。

Move your reflected copy to make a nice symmetrical flower. Create an ellipse with the same linear gradient, send it to back (Command-Shift-[), and place it in the center.
移動你的反射複本,使一個漂亮的對稱花。創建一個具有相同線性漸變的橢圓,將其發送到後面(Command-Shift-[),並將其放置在中心。

Step 9步驟9
With the Pen Tool (P), create a line with 2 px Weight and #030065 color. To change the stroke's parameters, use the Stroke panel (Window > Stroke). On the top of your stroke, add the small, dark blue circle. Select the circle and line, copy (Command-C), paste to front (Command-F), and flip it horizontally. Move it to the right place.
使用鋼筆工具(P),創建一條2 px權重和#030065顏色的線條。若要更改筆劃的參數,請使用「筆劃」面板(窗口>筆劃)。在你的筆觸的頂部,添加小的,深藍色的圓圈。選擇圓和直線,複製(Command-C),粘貼到前面(Command-F),然後水平翻轉。把它移到正確的地方。

Double-click on the Blend Tool from the Tools panel to open its settings. Select Spacing: Specified Steps, 3 steps. Press OK. Choose the Blend Tool, click on the first circle, and click the second. Now we have five circles.

Release the tool (I usually simply activate the Selection Tool (V) and choose the necessary tool again) and repeat with the lines.
釋放工具(我通常只是簡單地激活選擇工具(V) ,並再次選擇必要的工具),並重複與線。
Step 10步驟10
Select the anchor point with the Direct Selection Tool (A) from the big circle and convert it to a corner, as we did with the leaves. Move and transform it a bit to make it look nice. Also, I've moved the flower's inner part to the bottom. To select several objects (or anchor points), hold Shift.
選擇錨點與直接選擇工具(A)從大圓圈,並將其轉換為一個角落,因為我們做的樹葉。移動和轉換它一點,使它看起來不錯。另外,我把花的內部移到了底部。要選擇多個對象(或錨點),請按住Shift鍵。

Select all the elements and Group (Command-G) them.
Congratulations—our first element is ready!
2. How to Make the Drop Art Brush
Step 1
To hide and unhide the guidelines, use Command-;.
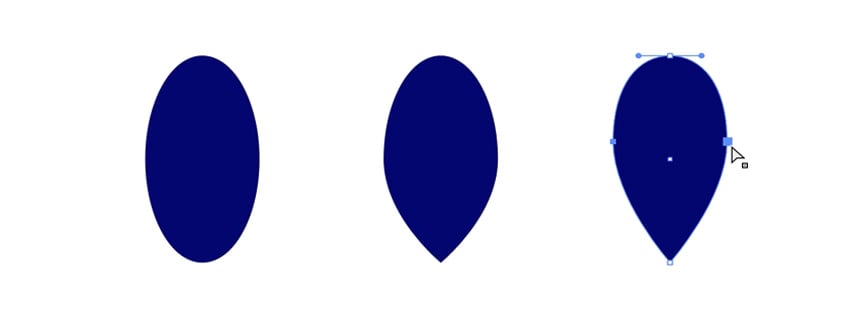
Draw an ellipse with a color of #030065. With the Direct Selection Tool (A), select the bottom anchor point and convert it to a corner. With the same tool, select the two middle anchor points (hold Shift to select several points) and move them up. You can use the keyboard arrows to move anchor points.
Step 2步驟2
Open the Brush panel (Window > Brushes) and simply move your drop inside the open panel. Choose the Art Brush type.
打開畫筆面板(窗口>畫筆),然後簡單地將拖放移動到打開的面板中。選擇藝術畫筆類型。
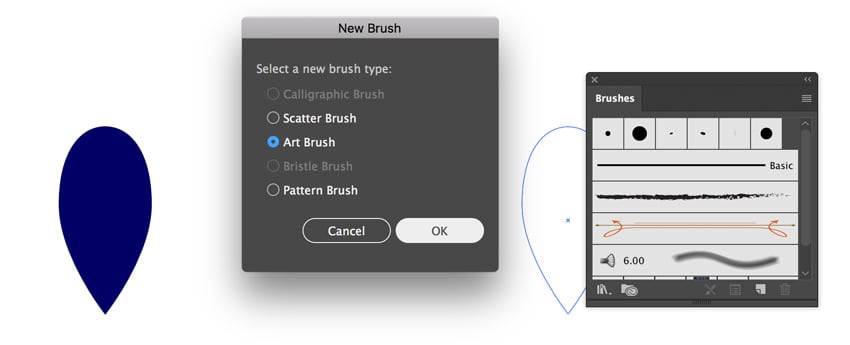
In the brush options that appear, name your brush and select Stretch to Fit Stroke Length.
在出現的畫筆選項中,命名您的畫筆並選擇「拉伸以適合描邊長度」。

Step 3步驟3
Time to check the new brush. With the Pencil Tool (N), draw random strokes and apply them to our drop brush. Be sure that the fill color (the top square) is empty.
是時候檢查一下新刷子了。使用筆刷工具(N),繪製隨機筆劃並將其應用到我們的下降筆刷。確保填充顏色(頂部正方形)為空。
Looks nice!看起來不錯!

3. How to Make a Branch With Leaves
3. 如何製作分支
Step 1步驟1
With the Line Segment Tool (\), draw a line. With the Pencil Tool (N), add some branches. Select your branches, copy (Command-C), paste to front (Command-F), and flip it horizontally. Move it to the right place. We have something like a tree now.

Step 2步驟2
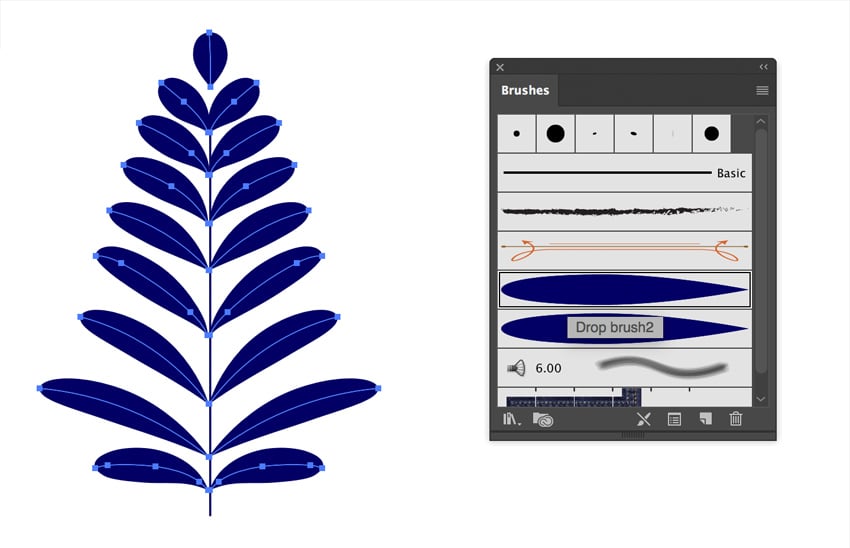
Duplicate our Drop brush (select the appropriate brush in the Brushes panel, go to the panel menu, and select Duplicate Brush). Double-click on the copy, rename the brush, and change the width to 40%.
複製我們的拖放筆刷(在「筆刷」面板中選擇適當的筆刷,轉到面板菜單,然後選擇「複製筆刷」)。雙擊複本,重命名畫筆,並將寬度更改為40%。

Step 3步驟3
Select your branch lines (except the vertical line) and apply to them your Drop brush 2.
選擇你的分支線(除了垂直線),並適用於他們你的下降刷2。
Step 4
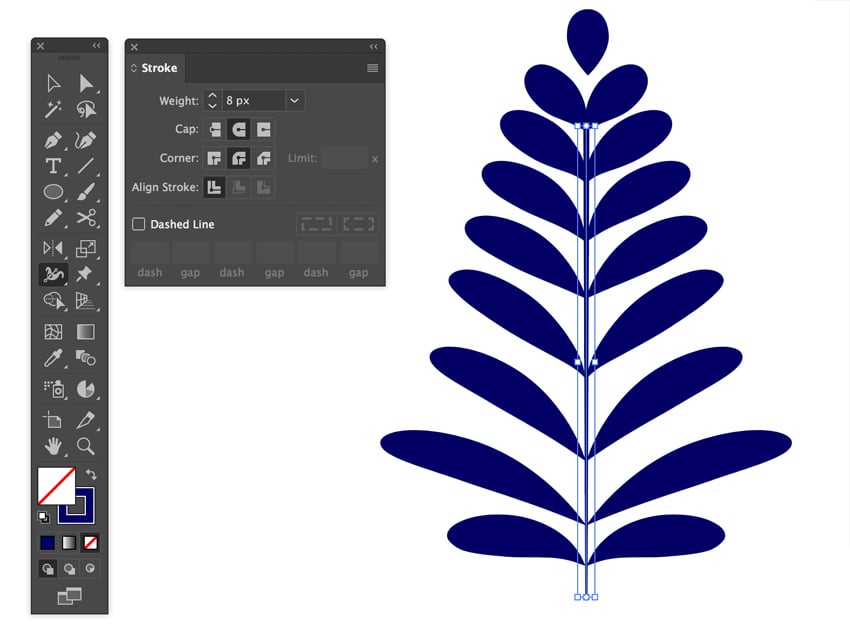
Select the vertical line in the Stroke panel (Window > Stroke). Set 8 px Weight and smooth corner and cap. Select the Width Tool from the Tools panel (Shift-W), select the bottom anchor point, and make it narrower (drag to the side).
在「描邊」面板中選擇垂直線(窗口>描邊)。設置8像素的權重和平滑的角和帽。從「工具」面板中選擇「寬度工具」(Shift + W),選擇底部錨點,並使其變窄(拖動到一側)。
Step 5步驟5
Select all the branch's elements and go to Object > Expand Appearance, Object > Path > Outline Stroke, Object > Path > Clean Up. Select all and click Unite from the Pathfinder panel (Window > Pathfinder).
選擇所有分支的元素,然後轉到對象%3 E展開外觀、對象%3 E路徑%3 E輪廓描邊、對象%3 E路徑%3 E清理。全部選中並單擊路徑查找器面板(窗口>路徑查找器)中的「合併」。

Step 6步驟6
Now we have a lot of unnecessary points. Go to Object > Path > Simplify and edit your parameters to have a nice look without excess points. Unite it again with the Pathfinder panel.
現在我們有很多不必要的分數。轉到對象>路徑>路徑並編輯您的參數,使其具有漂亮的外觀而沒有多餘的點。再次將其與路徑查找器面板相結合。

Select your branch and move it to the open brush panel. Create a new Art Brush. Choose the Scale Proportionately option.

Step 7步驟7
Check your new brush with random strokes. Looks nice!
用隨機筆畫檢查你的新畫筆。看起來不錯!
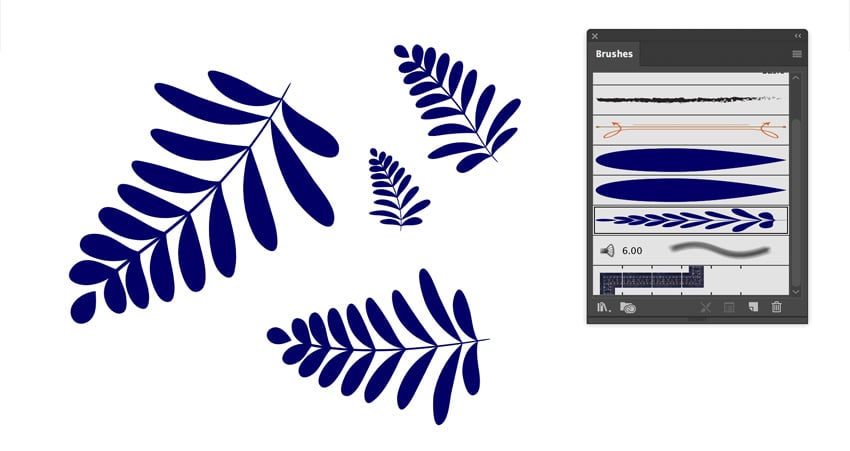
Step 8步驟8
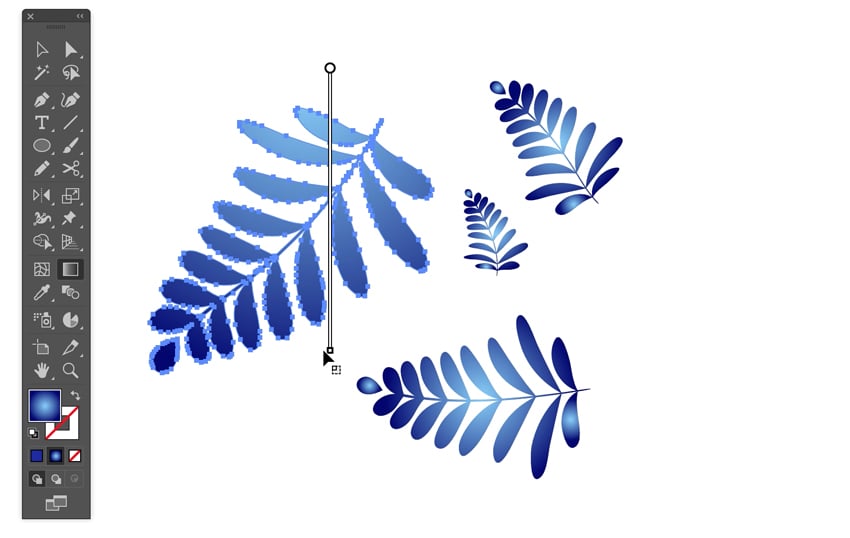
To color your branches with gradients, select them and go to Object > Expand Appearance, Object > Path > Clean Up. To edit the gradient, use the Gradient Tool (G) and move the white gradient tool. Be sure that the active color is the fill color (top square).
若要使用漸變為分支著色,請選擇它們,然後轉到對象>展開外觀,對象>路徑>清理。要編輯漸變,請使用漸變工具(G)並移動白色漸變工具。確保活動顏色是填充顏色(頂部正方形)。
4. How to Make the Second Flower
4. 如何製作第二朵花
Step 1
Unhide the guidelines (Command-;). You can use the old guideline or click on the vertical ruler and drag it to your artboard. With Drop brush 2, draw a stroke (B key for the Brush Tool). Set 2 px Stroke Weight.
取消隱藏指導線(Command-;)。您可以使用舊的參考線或單擊垂直標尺並將其拖到畫板上。使用拖放畫筆2繪製 一個筆畫(畫筆工具的B鍵)。設置2像素描邊粗細。
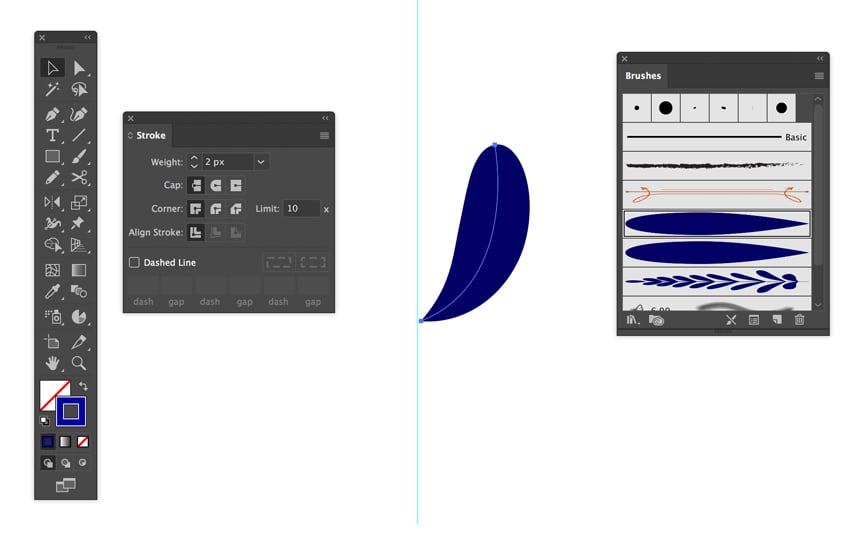
Step 2步驟2
Draw other leaves. Set 1.5 px Stroke Weight for the second and 1 px Stroke Weight for the others.
畫其他葉子。設置1.5 px描邊粗細為第二個和1 px描邊粗細為其他人。

Step 3步驟3
Select all the leaves and go to Object > Expand Appearance, Object > Path > Clean Up. Color all leaves except the first to Radial Gradient like the first big flower we did before, using the Eye Dropper Tool (I). Arrange the objects by sending them back. Simply select the relevant leaf and use the Command-Shift-[ shortcut. The dark blue leaf (the first) is on the top.
選擇所有葉子,然後轉到對象>展開外觀,對象>路徑>清理。顏色所有的葉子,除了第一個徑向梯度一樣,我們之前做的第一個大花,使用滴管工具(一)。通過將它們發送回來來排列對象。只需選擇相關的葉子並使用Command-Shift-[快捷鍵。深藍色的葉子(第一片)在頂部。
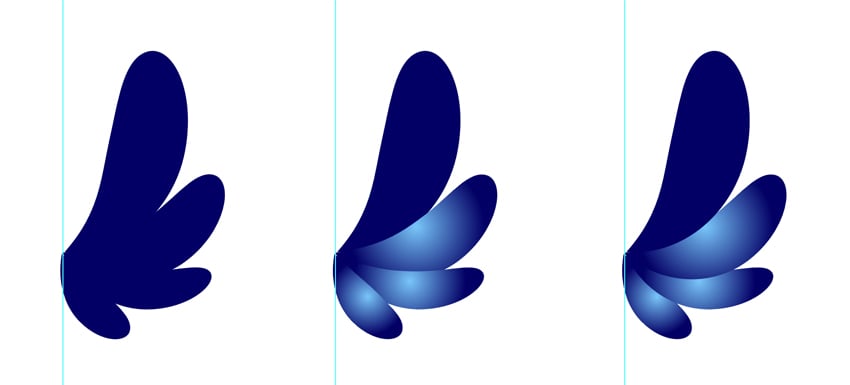
Step 4步驟4
Select all leaves, copy (Command-C), paste to front (Command-F), and flip them horizontally. Move if necessary. In the center, add a small circle with the same Radial Gradient. Use the Ellipse Tool (L) while holding Shift to create a perfect circle.
選擇所有葉子,複製(Command-C),粘貼到前面(Command-F),然後水平翻轉它們。必要時移動。在中心,添加一個小圓圈與相同的徑向梯度。使用橢圓工具(L),同時按住Shift鍵創建一個完美的圓形。

Step 5步驟5
With the Pencil Tool (N), draw several strokes with a color of dark blue #030065 and Stroke Weight of 3 px. On the top of your strokes, add some dark blue circles. Select the strokes and circles and send them to back (Command-Shift-[). Select all the elements of your flower and group them (Command-G).
使用描邊工具(N),繪製幾個顏色為深藍色#030065的描邊,描邊粗細為3 px。在你的筆觸的頂部,添加一些深藍色的圓圈。選擇筆劃和圓並將它們發送到後面(Command-Shift-[)。選擇花的所有元素並將它們分組(Command-G)。

5. How to Make a Small Additional Flower
5. 如何製作小紅花
Step 1步驟1
With the Polygon Tool (this tool is located in the same spot as the Rectangle or Ellipse Tool on the Tools panel—right-click on it and you will see all variants), draw a polygon with six corners. Use the up and down keyboard arrows to change the corners amount while drawing it.
使用多邊形工具(此工具與工具面板上的矩形或橢圓形工具位於同一位置-右鍵單擊它,您將看到所有變體),繪製一個具有六個角的多邊形。使用鍵盤上的向上和向下箭頭來改變角的數量,同時繪製它。

Step 2步驟2
Select your polygon, go to Effects > Distort & Transform > Pucker & Bloat, and set the parameters to have a nice flower shape. Object > Expand Appearance afterwards.
選擇多邊形,轉到效果>扭曲變換>摺疊膨脹,並設置參數以具有漂亮的花朵形狀。對象>之後展開外觀。

Step 3步驟3
Color the flower with a Radial Gradient and add a small dark blue circle to the center. To align the circle and flower, use the Align panel (Window > Align), selecting Horizontal Align Center and Vertical Align Center. Group (Command-G) the flower and inner circle. We are done with the small flower.
顏色的花與徑向梯度,並添加一個小的深藍色圓圈的中心。要對齊圓和花,請使用「對齊」面板(窗口>對齊),選擇「水平居中對齊」和「垂直居中對齊」。組(Command-G)花和內圈。我們已經完成了小花。

6. How to Make the Pattern
6. 如何製作紙樣
Step 1步驟1
We've finished all our pattern elements, so now we can assemble the design.
我們已經完成了所有的圖案元素,所以現在我們可以組合設計了。
Randomly put your objects on the artboard (artboard size 1000 px x 1000 px). Rotate them and change their size if you need with the Selection Tool (V). It's OK if some elements go beyond the borders. With the Drop Brush, draw several drops, changing the Stroke Weight if necessary (I used 0.5 px and 0.75 px). Draw branches with the branch brush.
隨機將對象放在畫板上(畫板大小1000 px 1000 px)。旋轉它們,並改變其大小,如果你需要與選擇工具(V)。如果有些元素超出了邊界,也沒關係。用水滴筆刷,畫幾滴水滴,如果需要的話,改變筆劃粗細(我用了0.5px和0.75px)。用分支畫筆繪製分支。

Step 2步驟2
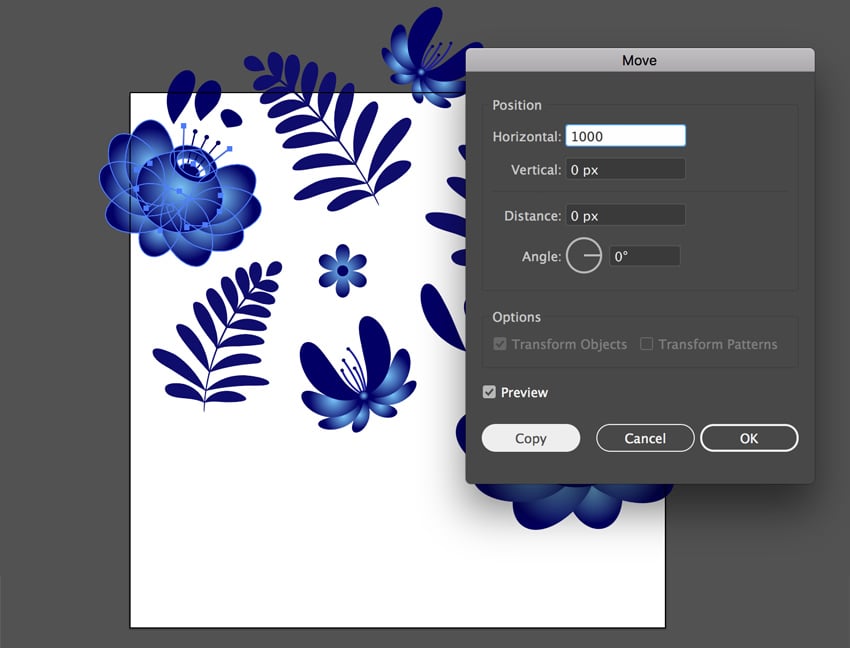
Select an object that goes beyond the border (I chose the big flower from the left side) and press Enter. Set Horizontal (or Vertical if you need to copy it vertically) to 1000 px (our artboard width) and press Copy. Our object is copied to the right place now.
選擇一個超出邊框的對象(我選擇了左邊的大花),然後按Enter鍵。設置水平(或垂直,如果你需要垂直複製它)為1000像素(我們的畫板寬度),並按複製。我們的對象現在被複製到正確的位置。
If you need to move an object to the right (or above), use negative values like -1000px.
如果需要將對象向右(或向上)移動,請使用負值,如-1000px。
Step 3步驟3
Repeat this action with all overlapping objects.
對所有重疊對象重複此操作。
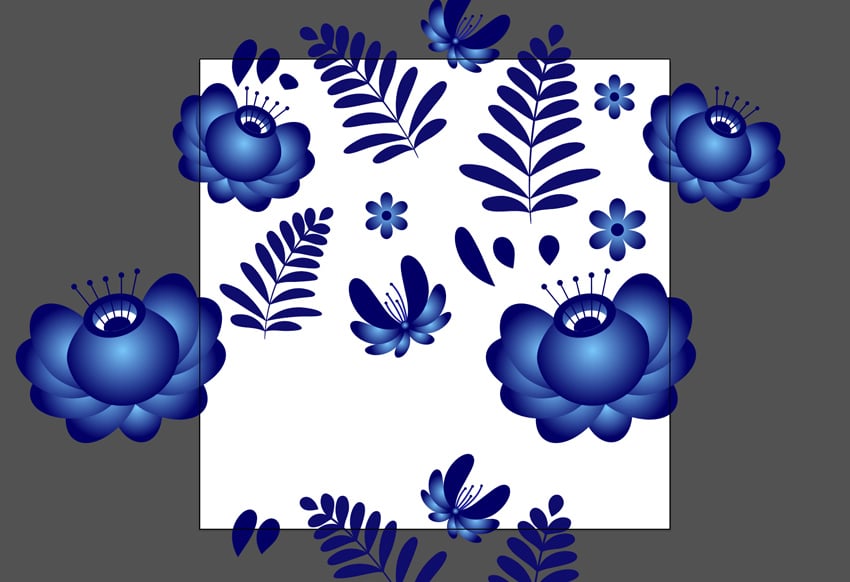
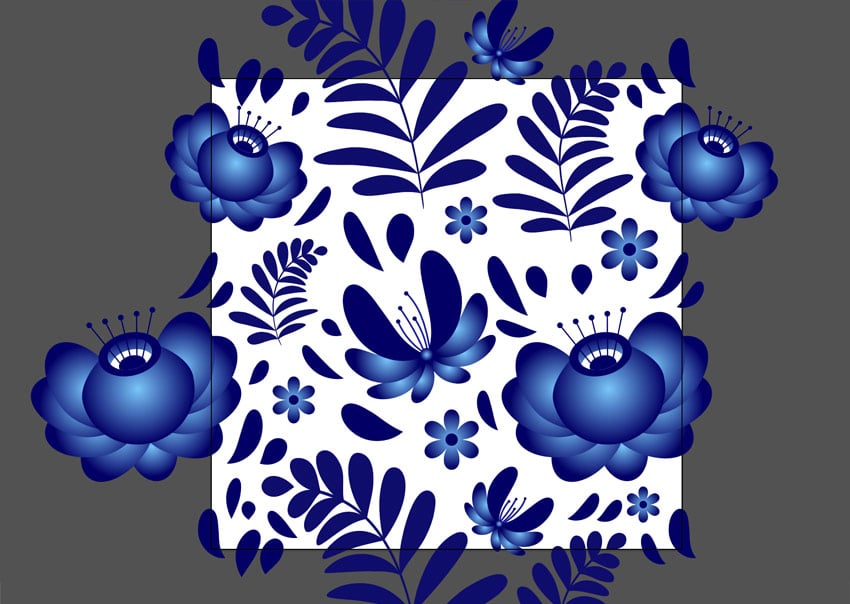
Edit your composition, adding drop strokes. I also edited the branches. With the Direct Selection Tool (A), select the anchor point and move it to have nice bend in the branch.
編輯你的作文,添加下拉筆劃。我還編輯了分支。使用直接選擇工具(A),選擇錨點並移動它以在分支中形成漂亮的彎曲。
Step 4步驟4
With the Magic Wand Tool (Y), click on any brush stroke. Now all drops and branches are selected. Go to Object > Expand Appearance and Object > Path > Clean Up. Keeping the selection, color it with a Radial Gradient (use the Eye Dropper Tool (I)). Again, I edited the size and rotation of some drops and elements. Pay attention to the location so as not to break the pattern.
使用魔杖工具(Y),點擊任何畫筆筆劃。現在所有的下拉和分支都已選中。轉到對象>展開外觀和對象>路徑>清理。保持選區不變,用徑向漸變上色(使用滴管工具)。同樣,我編輯了一些水滴和元素的大小和旋轉。注意位置,以免打破格局。

Step 5步驟5
Select the Rectangle Tool (M) and click on the artboard. In the window that appears, set the size to 1000 x 1000 px.
選擇矩形工具(M),然後點擊畫板。在出現的窗口中,將大小設置為1000 x 1000 px。

Step 6步驟6
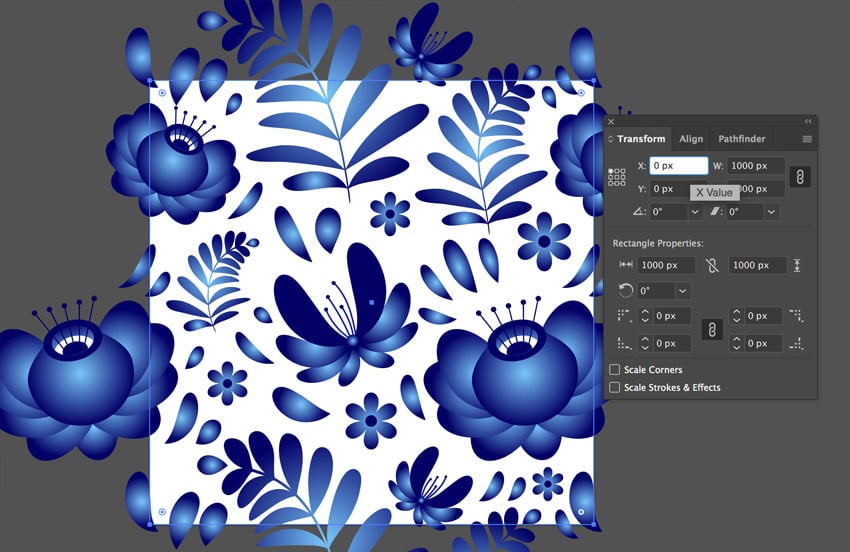
Color the new big square in white #ffffff and send it back (Command-Shift-[). Open the Transform panel (Window > Transform) and set x: 0 px and y: 0 px. In this panel, you can also edit an object's size.
用白色#ffffff將新的大正方形著色並將其發送回(Command-Shift-[)。打開「變換」面板(窗口>變換)並設置x:0 px和y:0 px。在此面板中,您還可以編輯對象的大小。
Step 7步驟7
Copy (Command-C) the white square, paste to front (Command-F), and bring it to front (Command-Shift-]). Select all elements and right-click on them. Select Make Clipping Mask.
複製(Command-C)白色方塊,粘貼到前面(Command-F),然後將其置於前面(Command-Shift-])。選擇所有元素並右鍵單擊它們。選擇「生成剪裁蒙版」。

Step 8步驟8
We have our pattern cropped. To check the pattern, select it and press Enter. Copy and move it horizontally and vertically by 1000px. Looks nice!
我們把圖案剪了。要檢查圖案,請選擇它並按Enter鍵。複製並將其水平和垂直移動1000 px。看起來不錯!

Congratulations! Our Russian Gzhel Style Pattern Is Finished!
恭喜你!我們的俄羅斯Gzhel風格的圖案完成了!
In this tutorial, we've learned some simple Adobe Illustrator tricks and created a fancy folk-style pattern. With this method, you can create any pattern with different elements. I hope you've discovered some useful things in this tutorial and learned how to create a traditional Russian floral pottery design!
在本教程中,我們學習了一些簡單的Adobe Illustrator技巧,並創建了一個奇特的民間風格圖案。使用此方法,您可以創建具有不同元素的任何圖案。我希望你在本教程中發現了一些有用的東西,並學會了如何創建一個傳統的俄羅斯花卉陶器設計!

Share your great results here in comments, and check our other great Adobe Illustrator tutorials to learn some more pro tips!
在評論中分享您的偉大成果,並查看我們其他偉大的Adobe Illustrator教程,以了解更多的專業技巧!


